
Home > Device Migration Process
Download this articleDevice Migration Process
The sections below describe the general process for device migration. The details in this document are intended to serve as general guidance and may require minor adjustments based on your environment.
Additional steps may be required, and some steps in the process may be optional depending on your migration requirements.
Roles active in the Migration Process
The following roles are involved in the migration process:
-
IT administrator/migration operator is responsible for executing migrations, preparing agents on the server infrastructure and devices, for example, deploy Device Agent to all target workstations via GPO.
-
Configuring app registrations and connections
-
Preconfiguring agent setups and configurations for devices
-
Preparing migration projects and mappings
-
Planning the migration
-
Executing the migration
-
-
End user - The employee who uses the computer that undergoes the domain rejoin.
-
Configuring app reconfiguration if the IT administrator does not use the automatic reconfiguration option in the migration policy
-
Signing in to the computer using their new domain credentials after migration
-
Verifying that the migration completed successfully without exceptions
-
Preparation
Before the migration, you need to identify what object types Fly supports. See the Supported and Unsupported List.
1. Create app registration
Refer to the following steps to create an app registration:
-
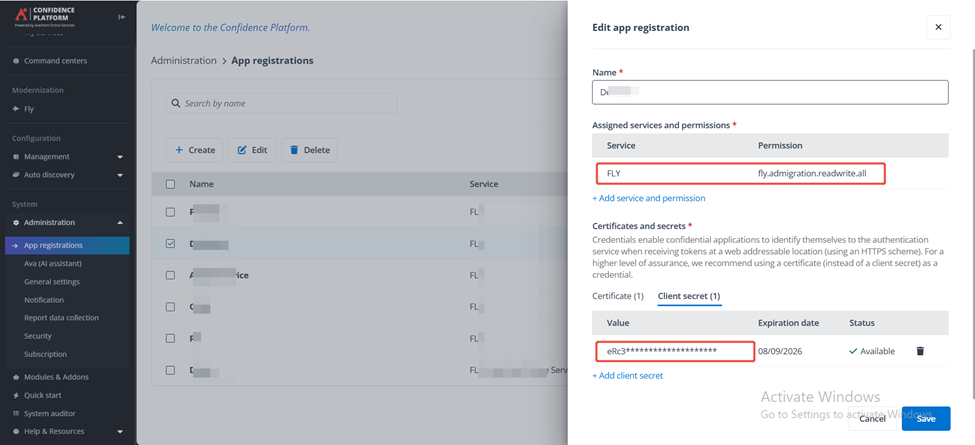
In AOS, navigate to Administration > App registrations.
-
Click Create to create an app registration.
-
Enter a name for the app registration.
-
Click Add service and permission and select the checkbox of fly.admigration.readwrite.all.
-
Click Client secret tag and click Add client secret.
NOTEClient secret values cannot be viewed, except for immediately after creation. Make sure to save the secret when created before leaving the page.
-
Click Save.
2. Create source and destination connections
Refer to Create a Connection to connect Fly to your source and destination device.
When you create destination connection, if you select to join Hybrid Identity domain with offline, please complete the Domain trust.
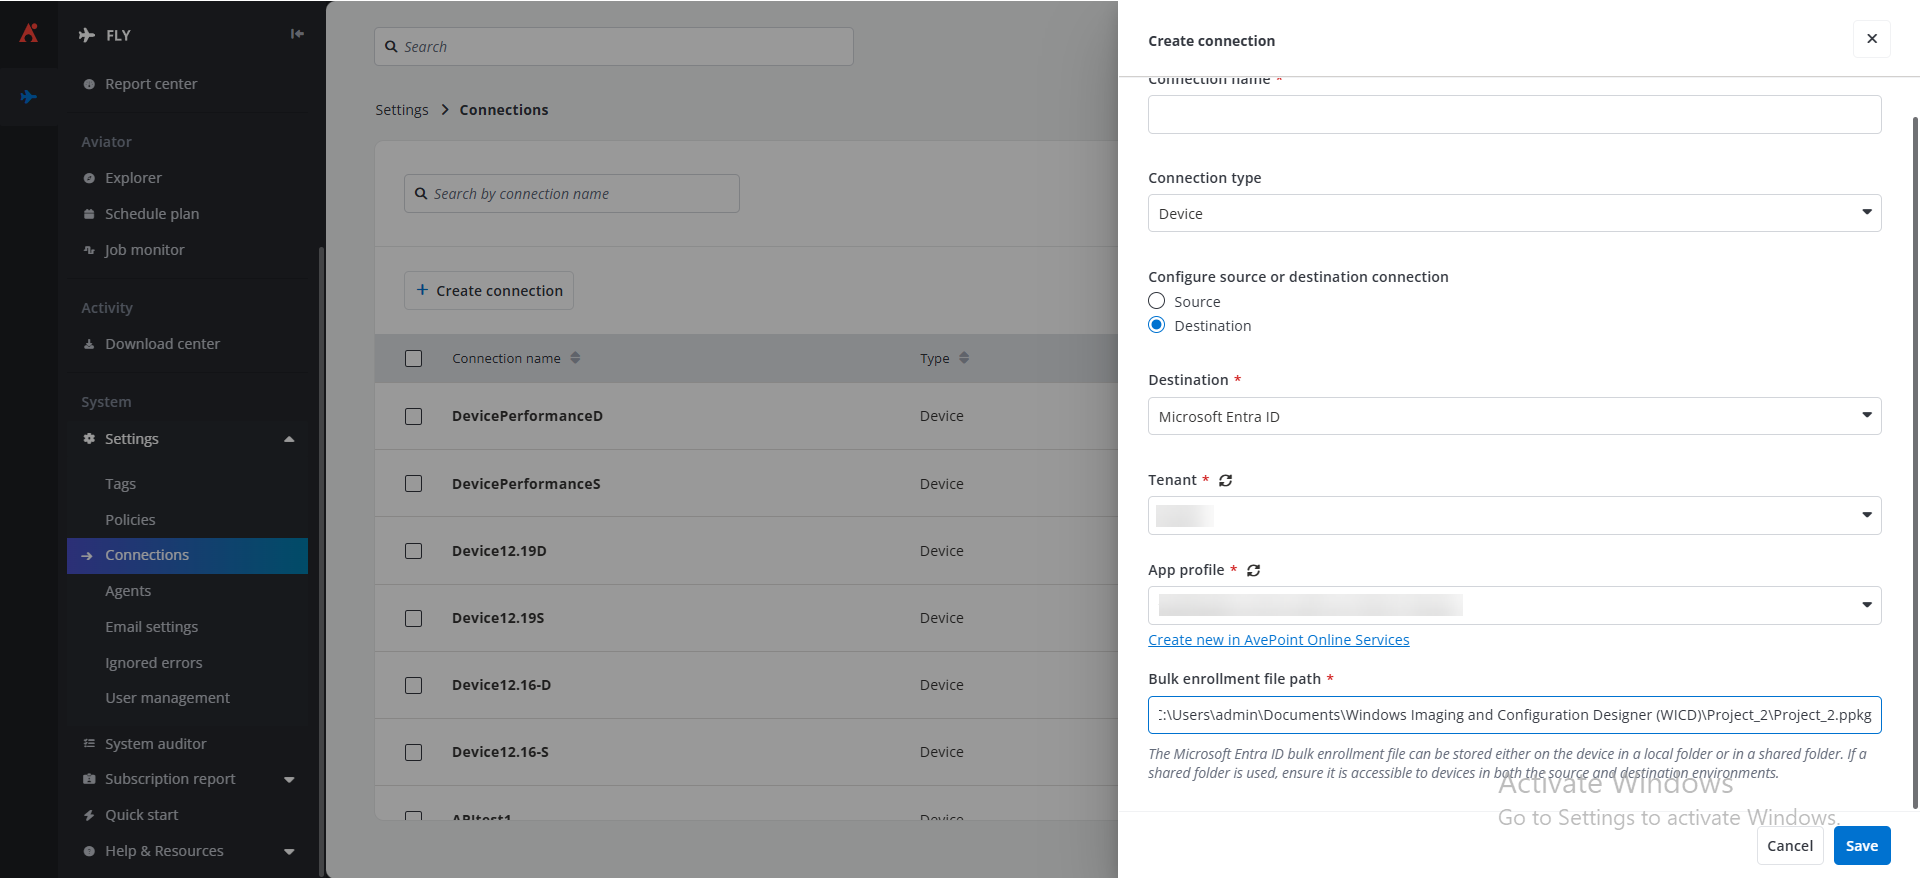
When you create destination connection, if you select to join Microsoft Entra ID with offline, please complete the Generate and input the bulk enrollment file path.
When you create destination connection, if you select join to Active Directory or Hybrid Identity domain with offline domain join, and enabled Cache user credentials for device logon policy, please complete the Cache user credential
2.1 Domain trust
If you select to join Active Directory or Hybrid Identity domain with offline, refer to the following steps for domain trust:
-
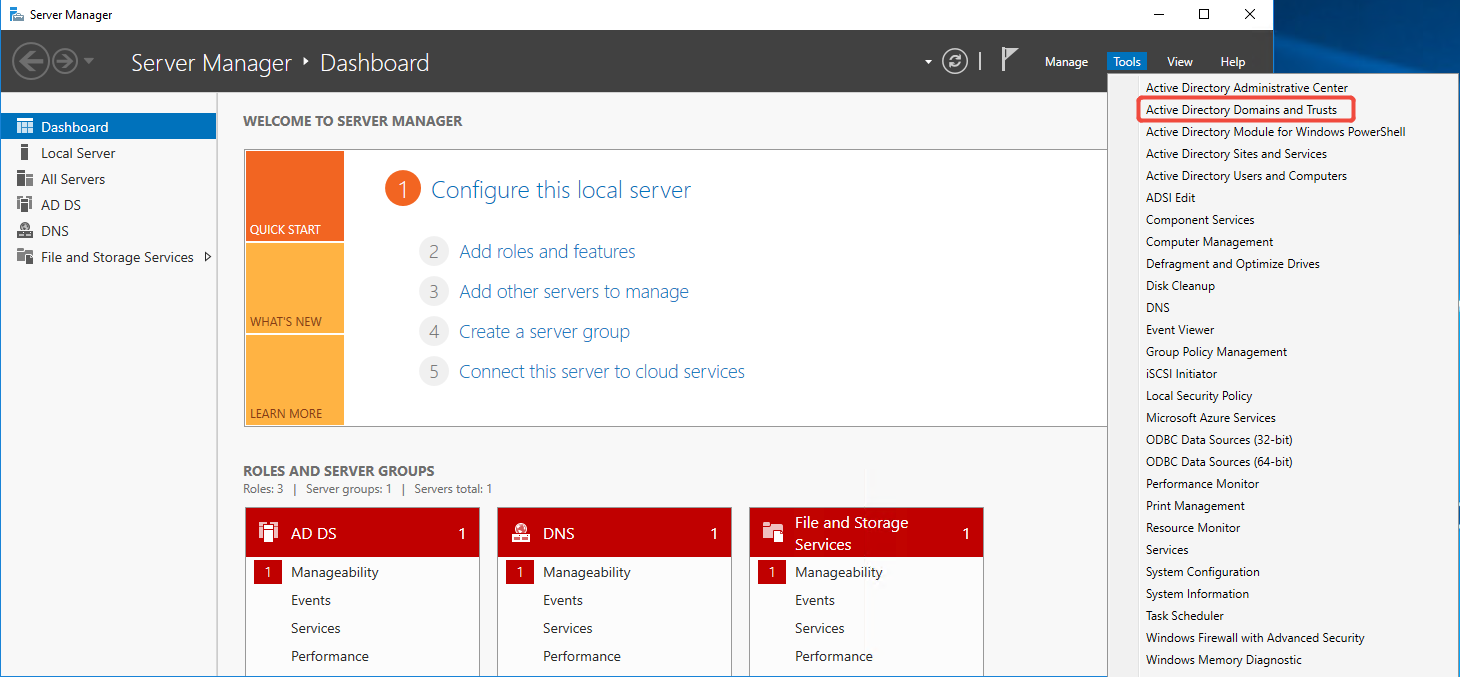
From a Source Forest Domain Controller, launch Server Manager, using the Tools drop down menu to select Active Directory Domain and Trusts.
-
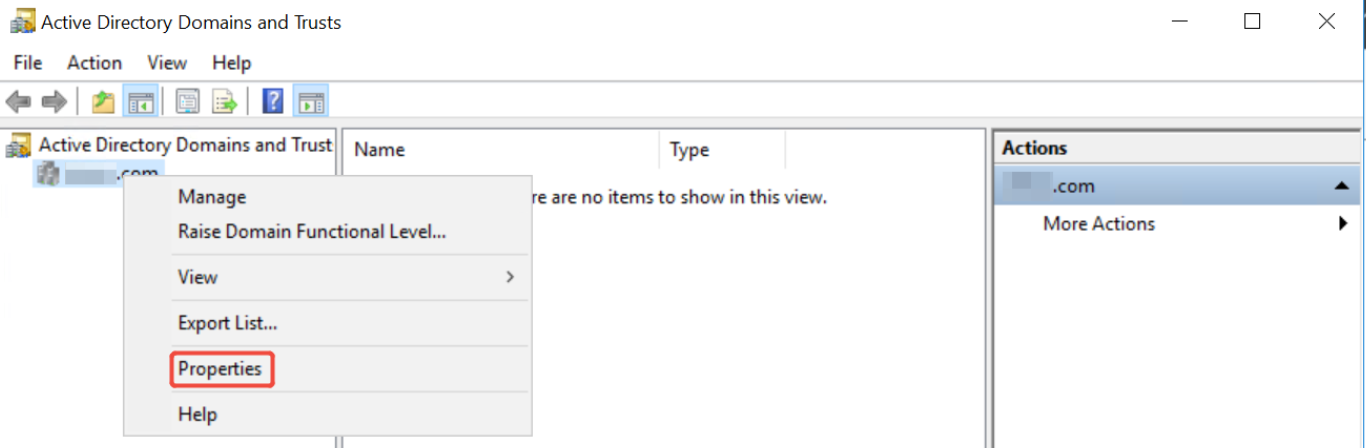
In Active Directory Domain and Trusts, right-click and choose Properties.
-
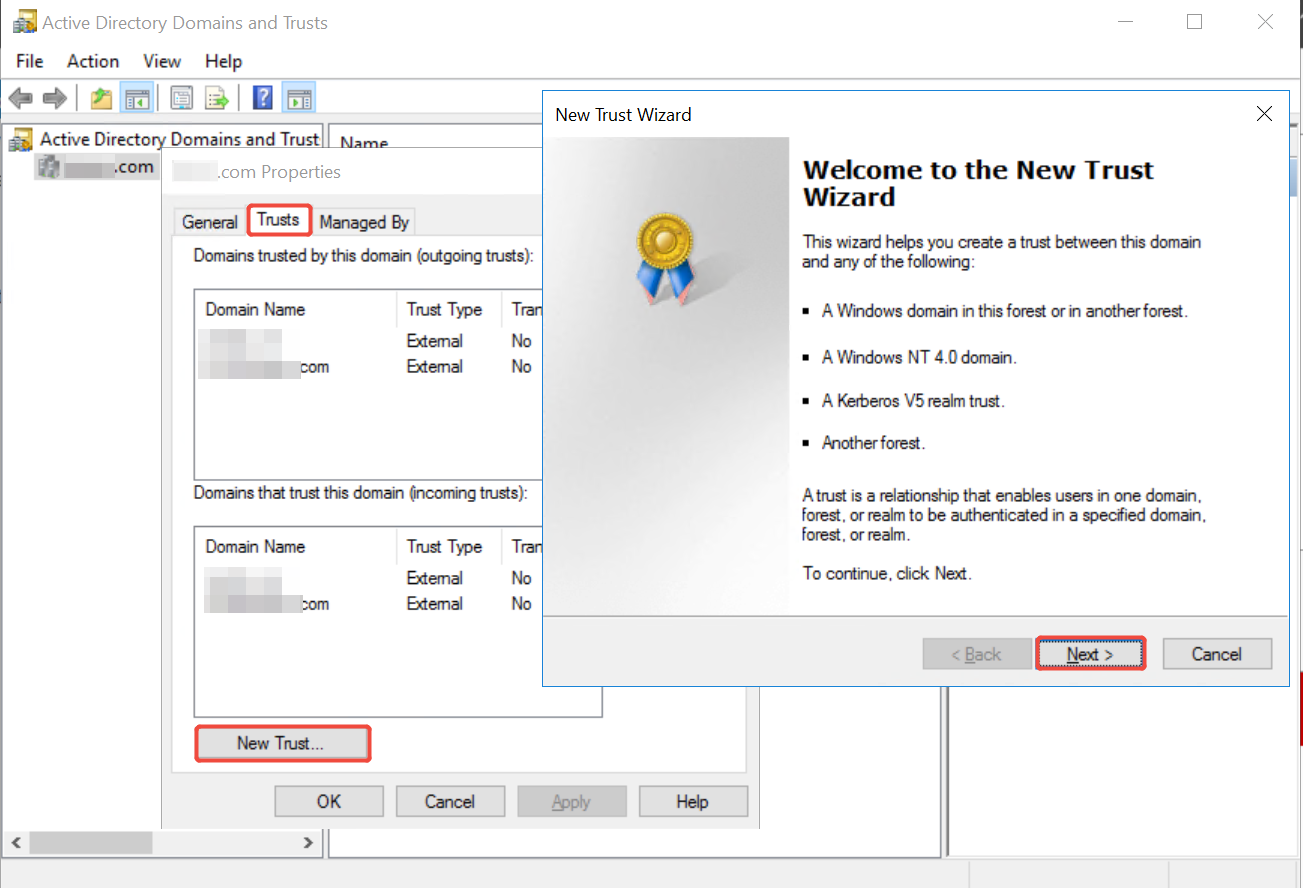
On the domain properties sheet, click the Trusts tab.
-
Click New Trust and then click Next on the Welcome to the Trust Wizard page.
-
On the Trust Name page, enter the name of the forest you want to establish trust with and then click Next.
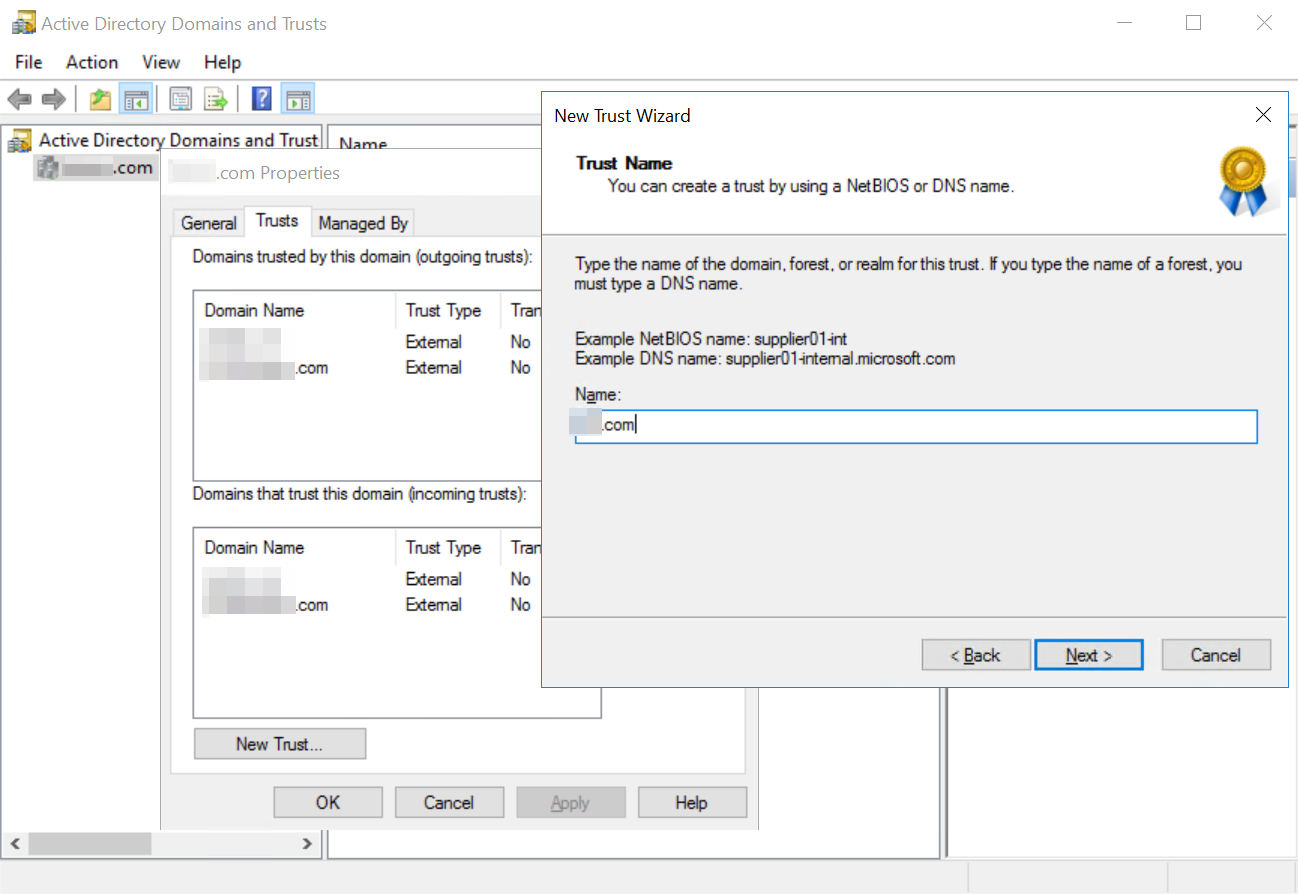
-
On the Trust Type page, select External trust and then click Next.
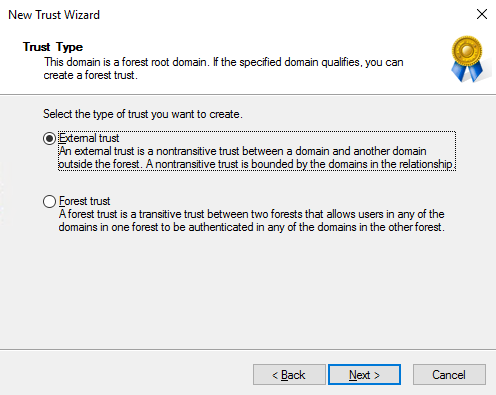
-
On the Direction of Trust page, select Two-way and then click Next.
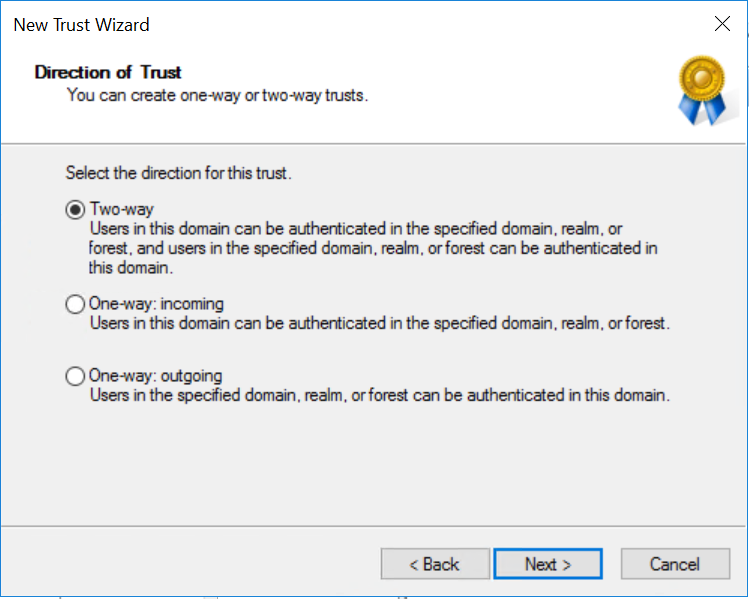
-
On the Sides of Trust page, select the domain you want to create the trust for and then click Next.
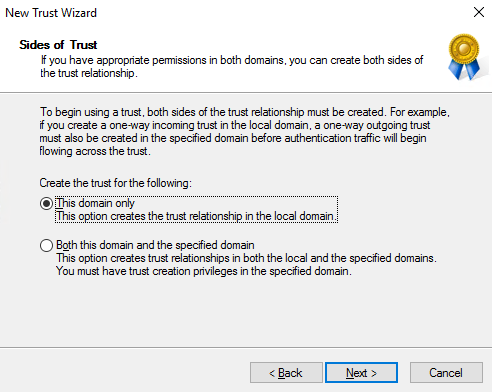 NOTE
NOTETo set the trust up for Both this domain and the specified domain, you will need the administrative privileges or know the administrator account and password for both domains.
-
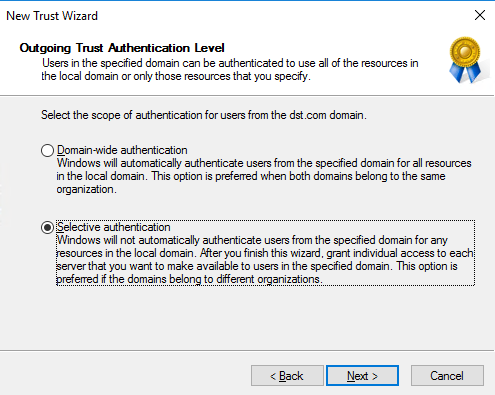
On the Outgoing Trust Authentication Level page, select Selective authentication and then click Next.
-
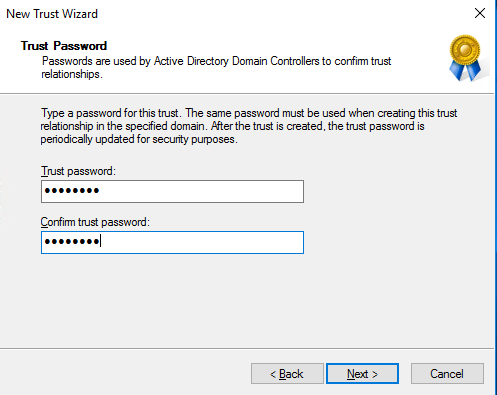
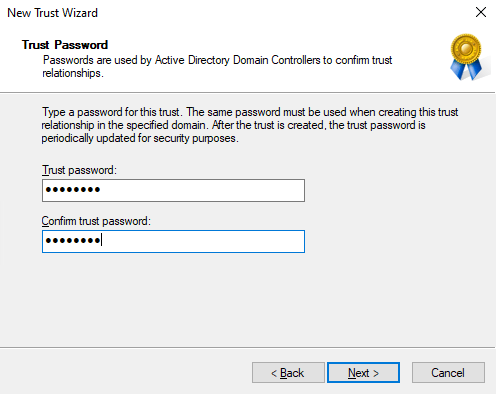
On the Trust Password page, enter a password that the administrators from both forests have agreed upon as the trust password and then click Next.
-
On the Trust Selections Complete page, click Next.
-
On the Trust Creation Complete page, click Next.
-
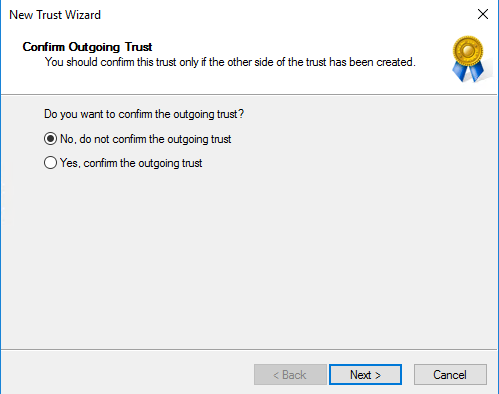
On the Confirm Outgoing Trust page and the Confirm Incoming Trust page, click Next. You will not be able to confirm the trust until the target side has been completed or if you are creating both relationships at the same time.
-
On the Completing the New Trust Wizard page, click Finish.
-
On the Domain Properties page, click Apply.
-
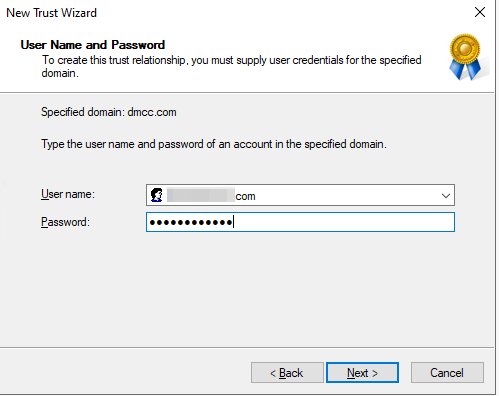
Once the Forest Trust created, you must have an administrator for the Target Forest complete the same process using the password agreed upon when setting up the source side trust relationship.
-
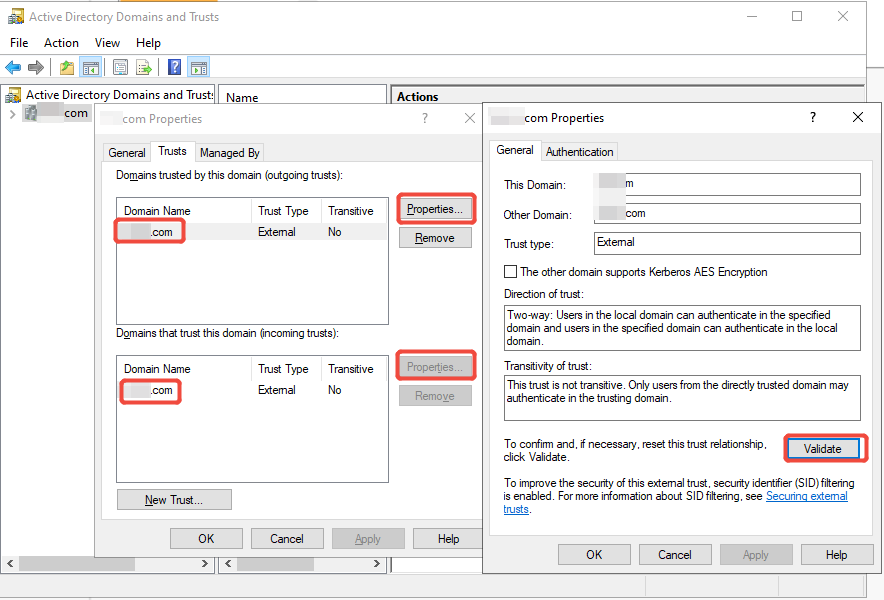
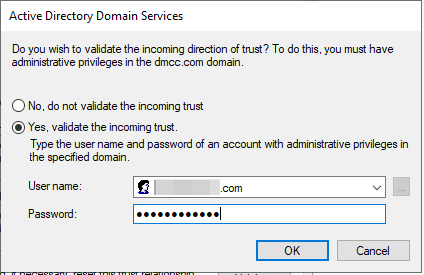
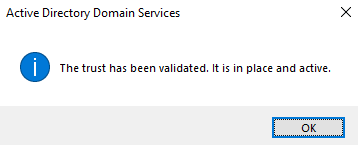
Once both sides setup, you can then click Validate to validate the relationship from the Source Forest Active Directory Domain and Trusts Properties view for the outgoing trust.
2.2 Generate and input the bulk enrollment file path.
If you select to join Microsoft Entra ID with offline, refer to the following steps to generate and input the bulk enrollment file path. You can refer to the official documentation of Install Windows Configuration Designer for details.
-
Install the Windows Configuration Designer in Microsoft store.
-
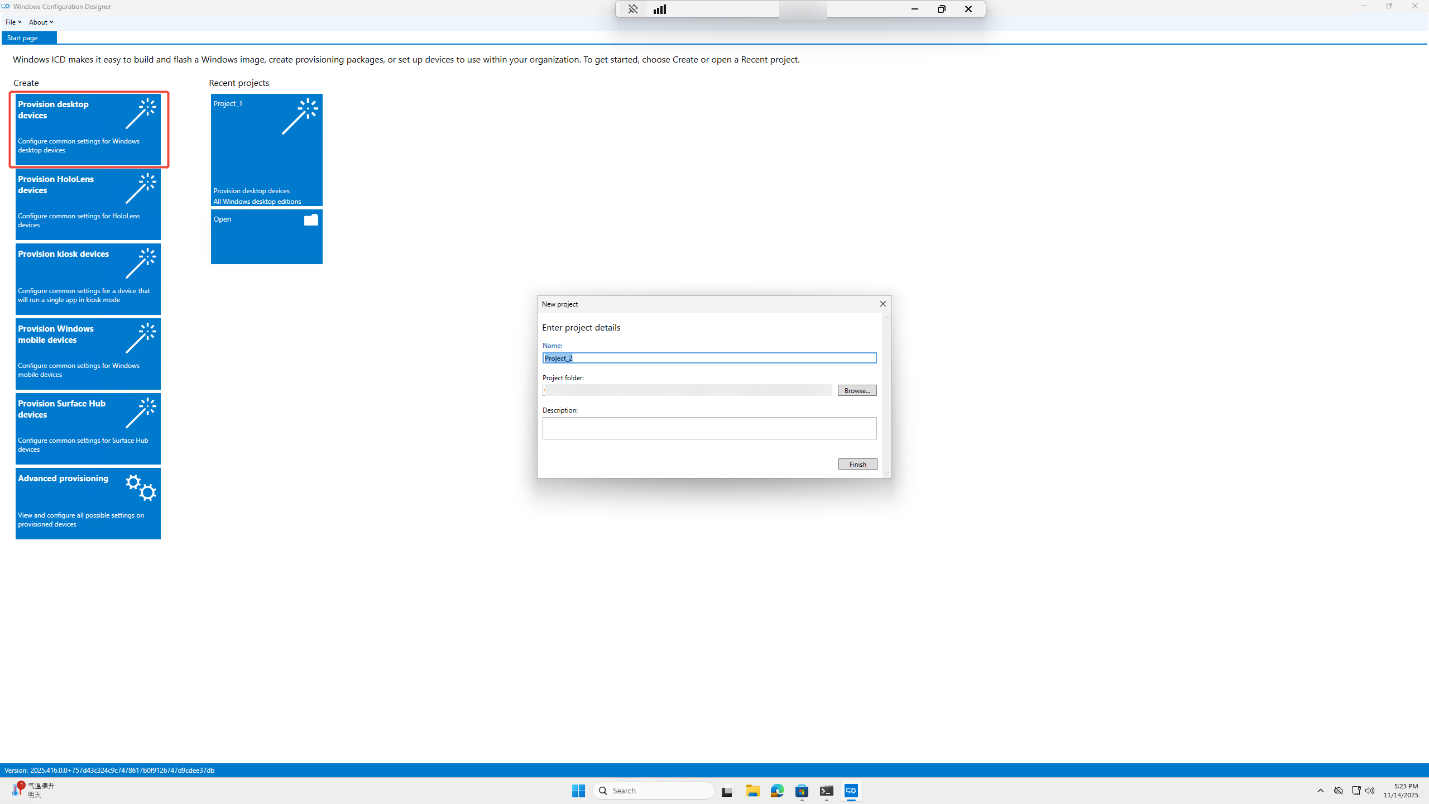
Open the designer and select the Provision desktop devices, enter the file name and path and then click Finish.
-
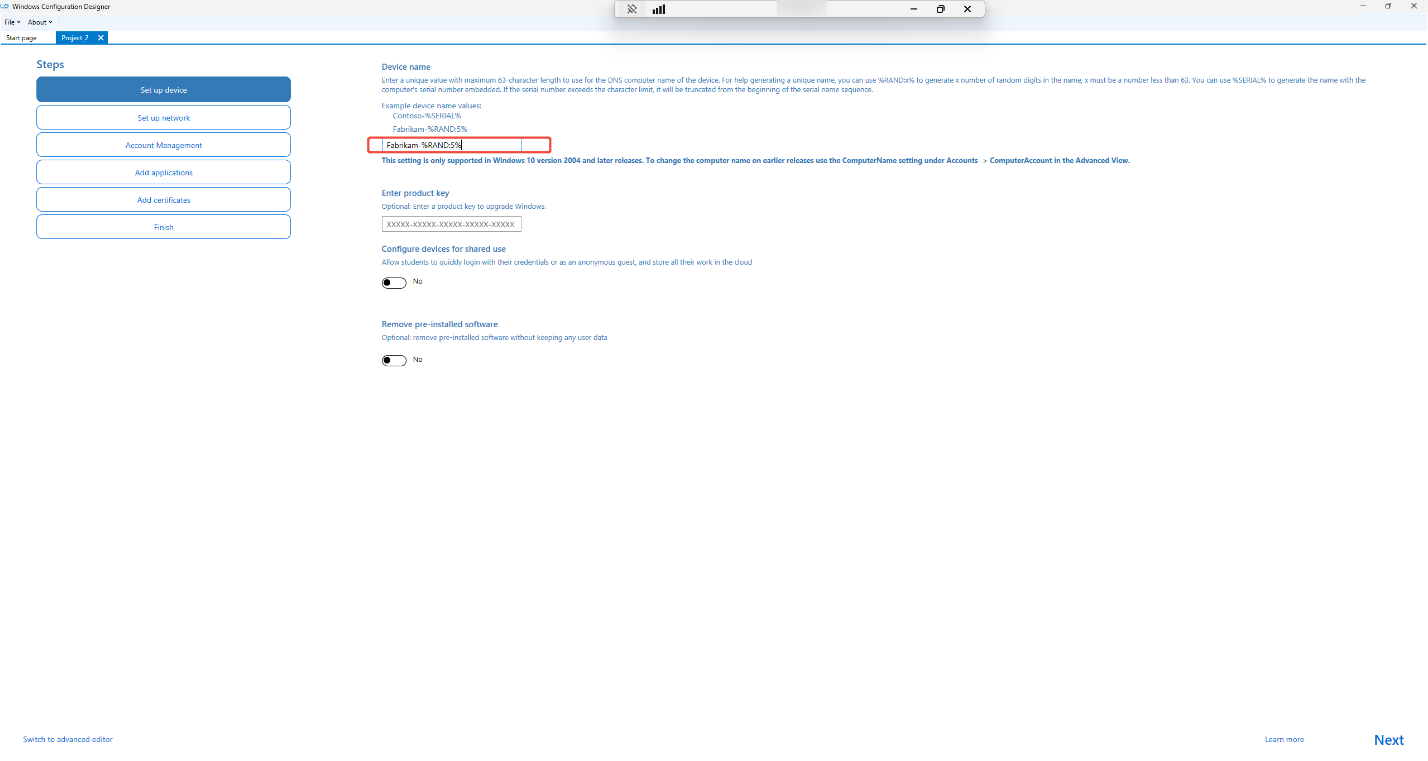
In the Set up device step, enter the device name and then click Next.
-
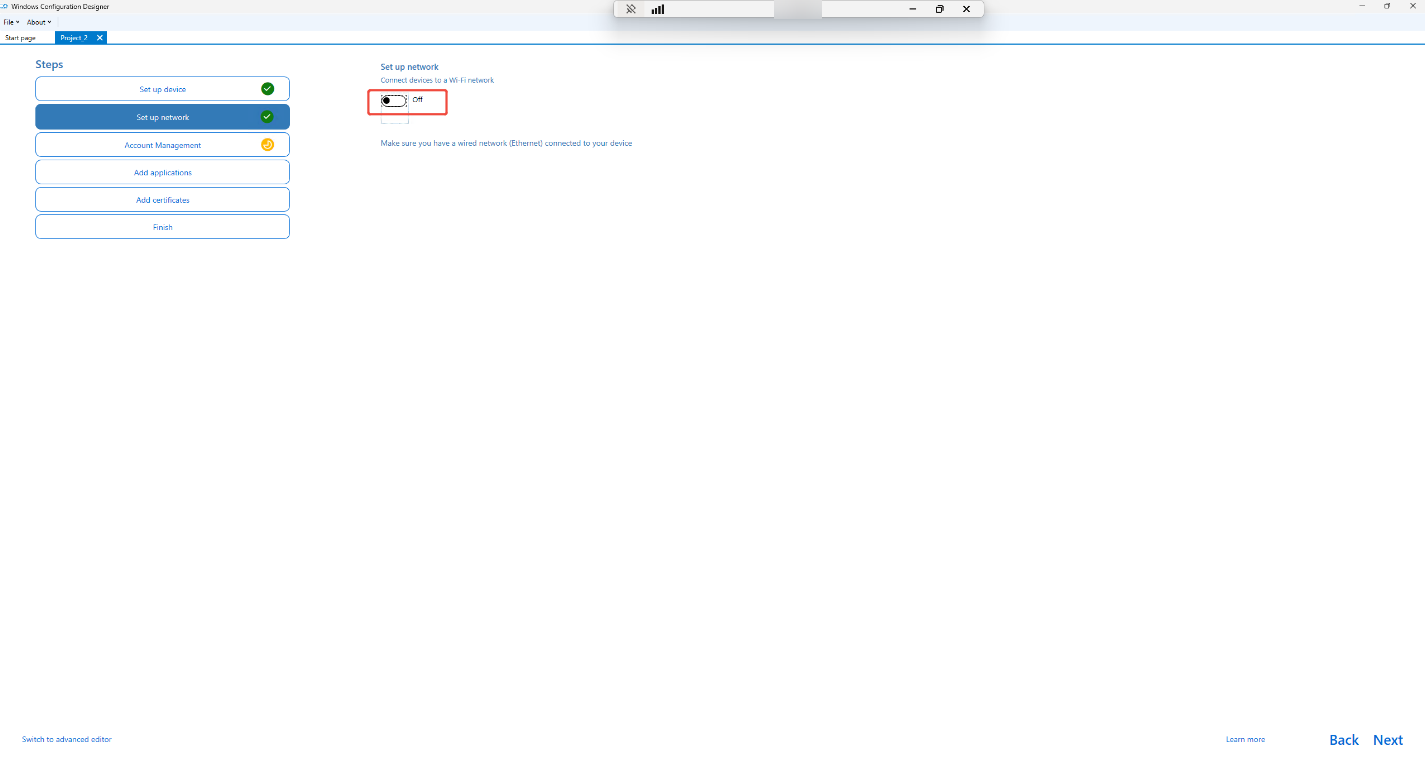
In the Set up network step, configure the network, you can set to off if no need and then click Next.
-
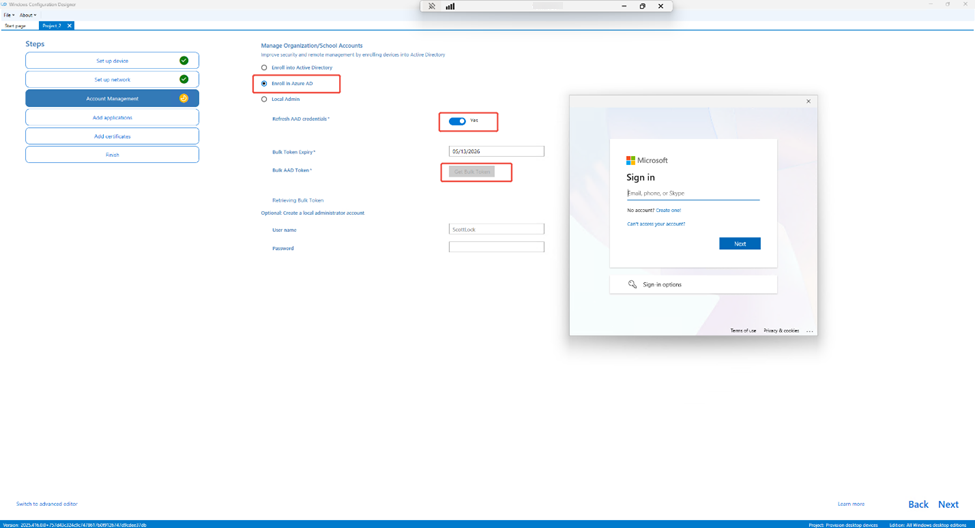
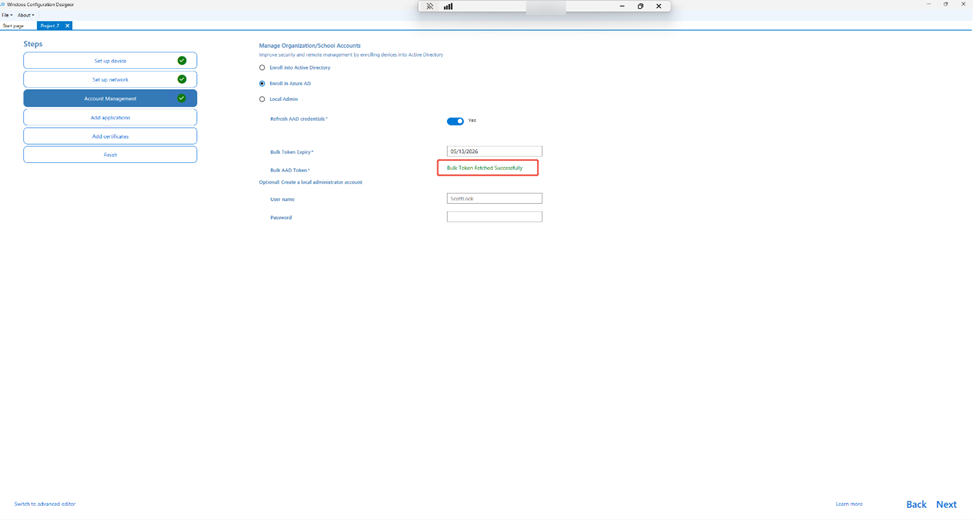
In the Account Management step, select Enroll in Azure AD, Refresh AAD credentials set to Yes, then click the Get Bulk Token and authorization and then click Next.
 NOTE
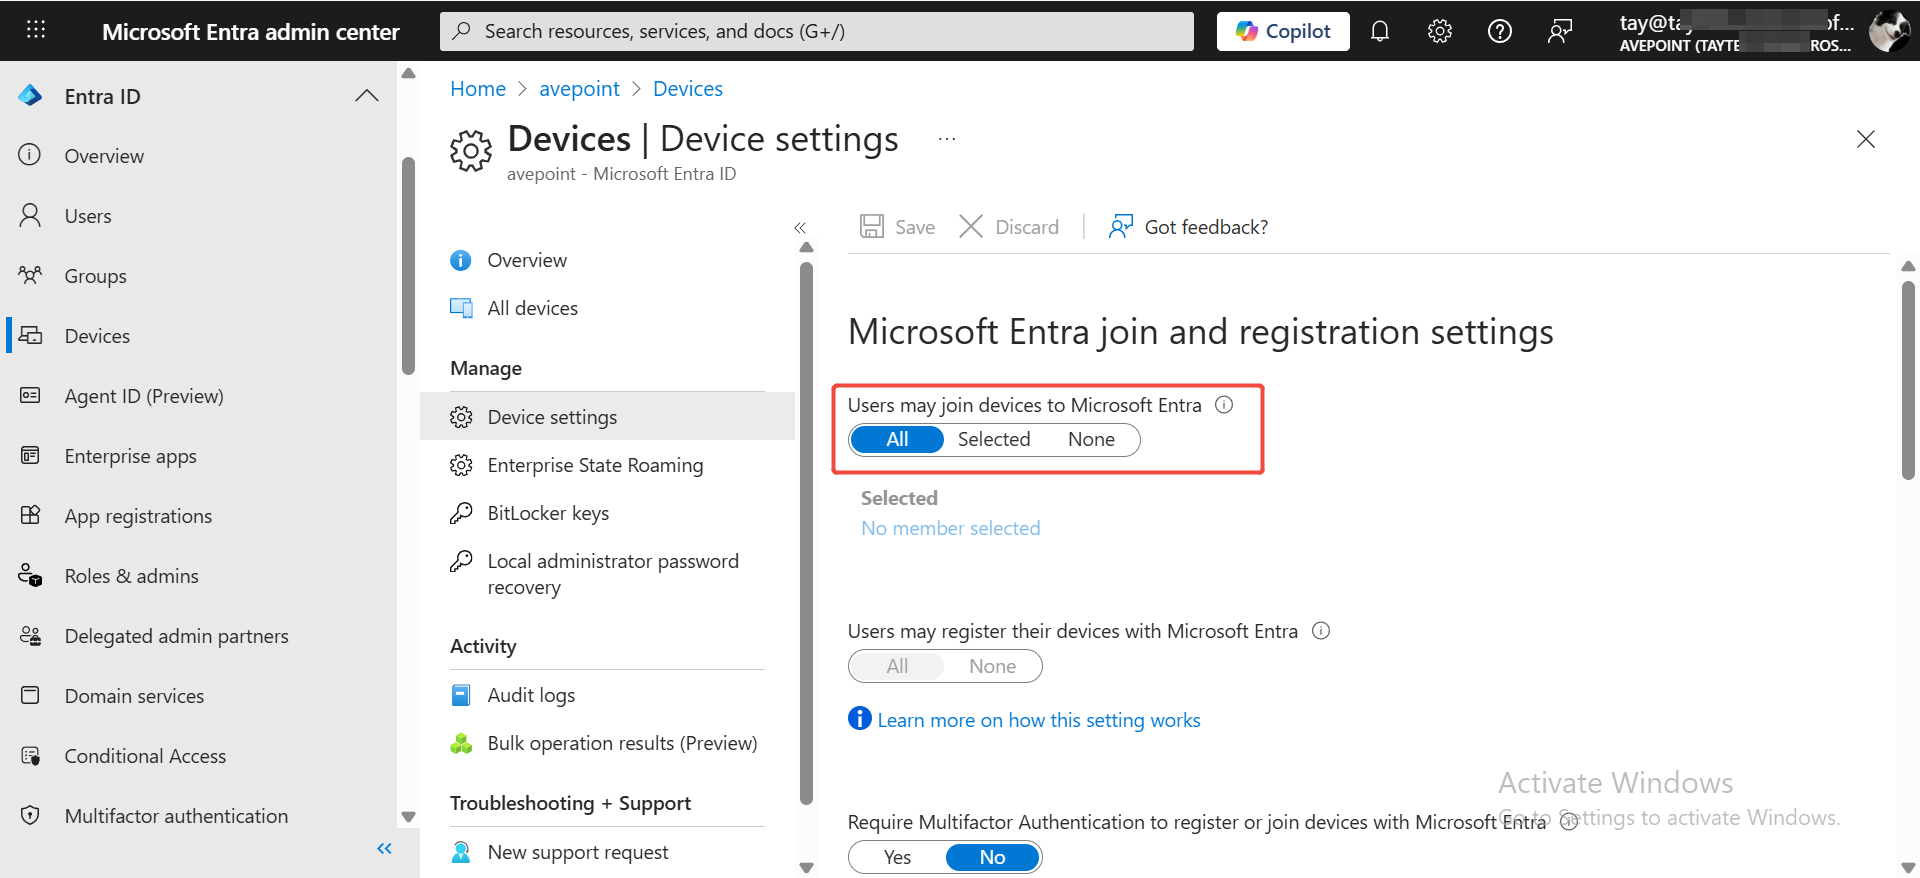
NOTEThe authorization account should belong to destination tenant that you want to join and make sure the authorized user selected in Users may join devices to Microsoft Entra.
-
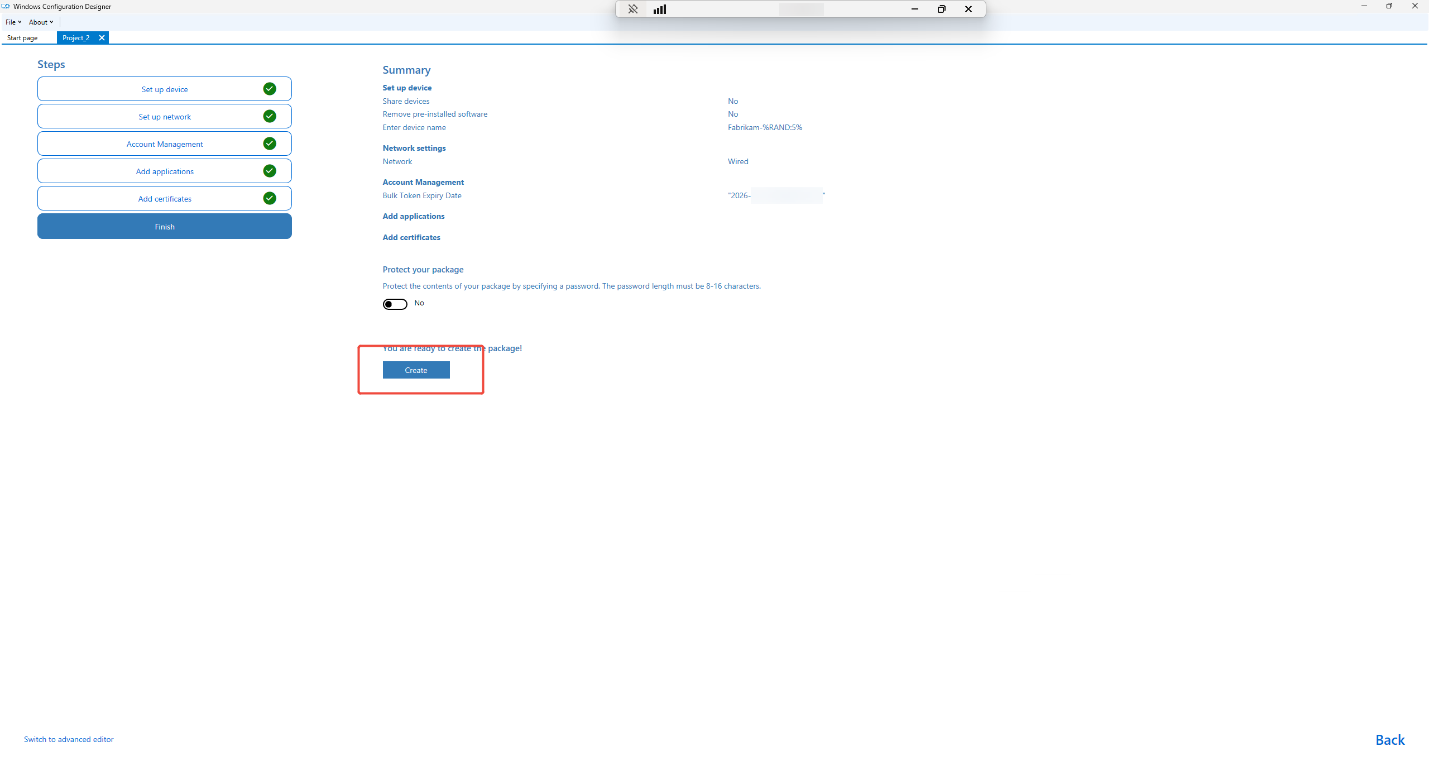
Click Next to access the Finish step and then click Create to generate the file.
-
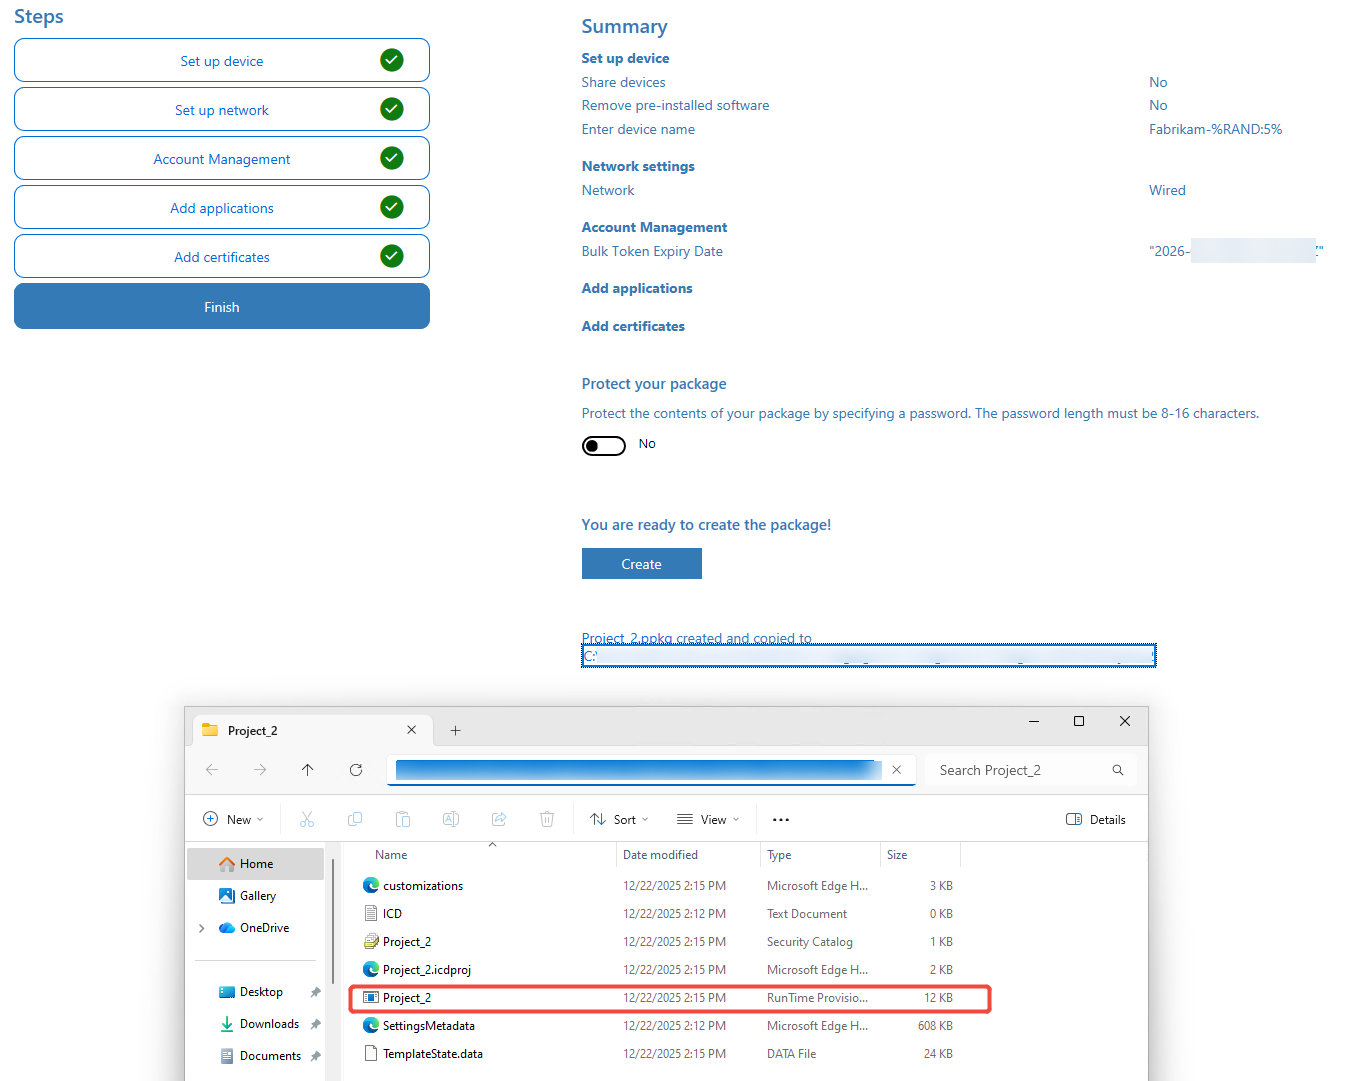
Copy the .ppkg file under the path to your device and copy the file path in your device to Bulk enrollment file path in destination connection.
2.3 Cache user credential
If you select join to Active Directory or Hybrid Identity domain with offline domain join, and enabled Cache user credentials for device logon policy, you need to submit a cache credential user. You can refer to the Cache user credentials part in Manage Fly Device Agent for details.
You need to allowed cache credential user to authenticate OU of source domain before submitting cache credentials user, refer to the following steps :
-
In source domain controller, open the Active Directory Users and Computers.
-
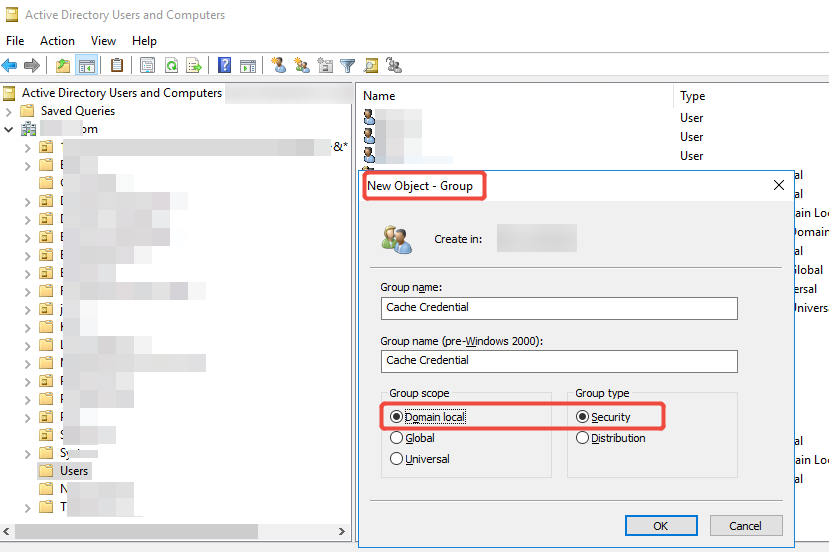
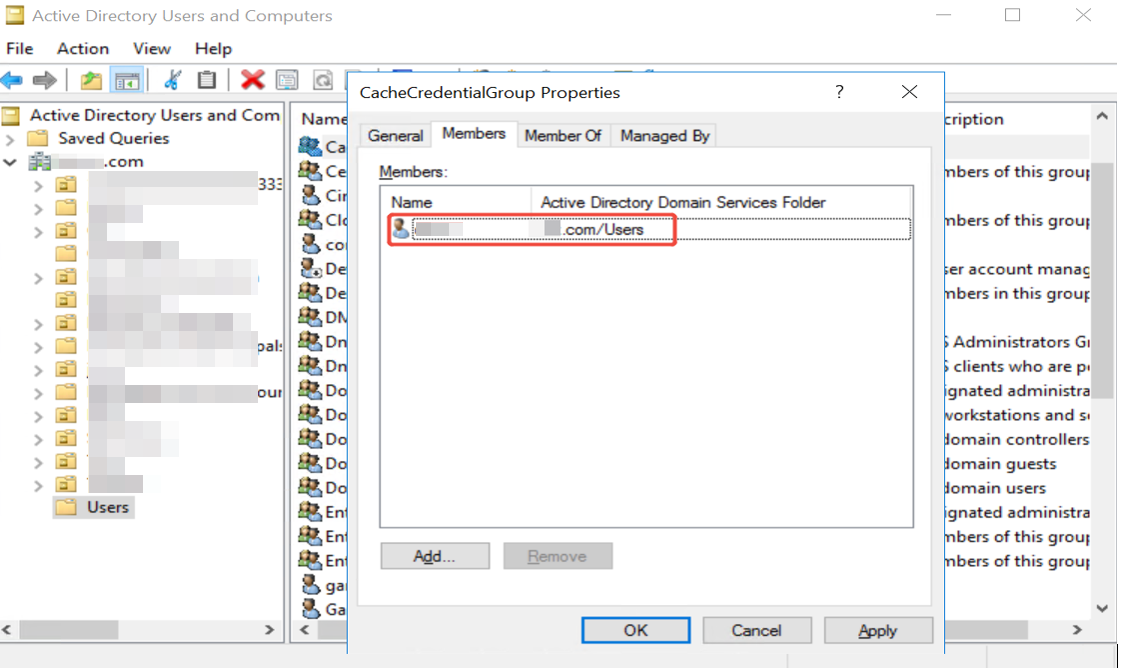
Create a group and select Domain local and Security and then add the cache credential user to members.
-
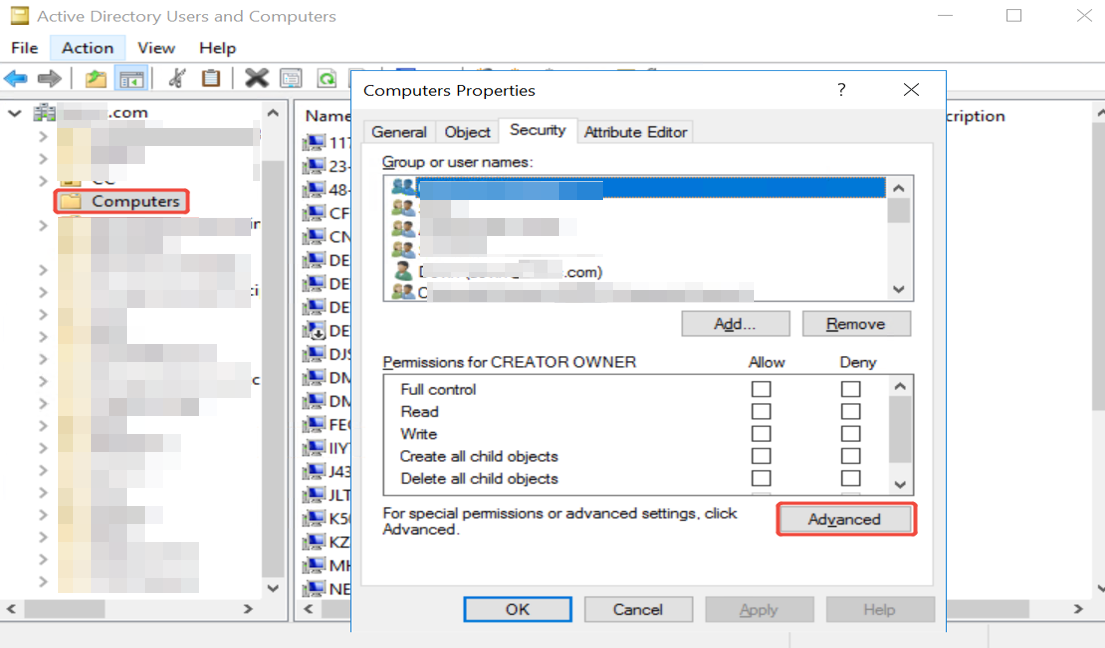
Select the OU to which the source device belongs and open property.
-
Select the Security tab and click Advanced.
 NOTE
NOTEIf you cannot found the Security, click View and enable Advanced Features in menu of active directory.
-
Click Add to add permissions.
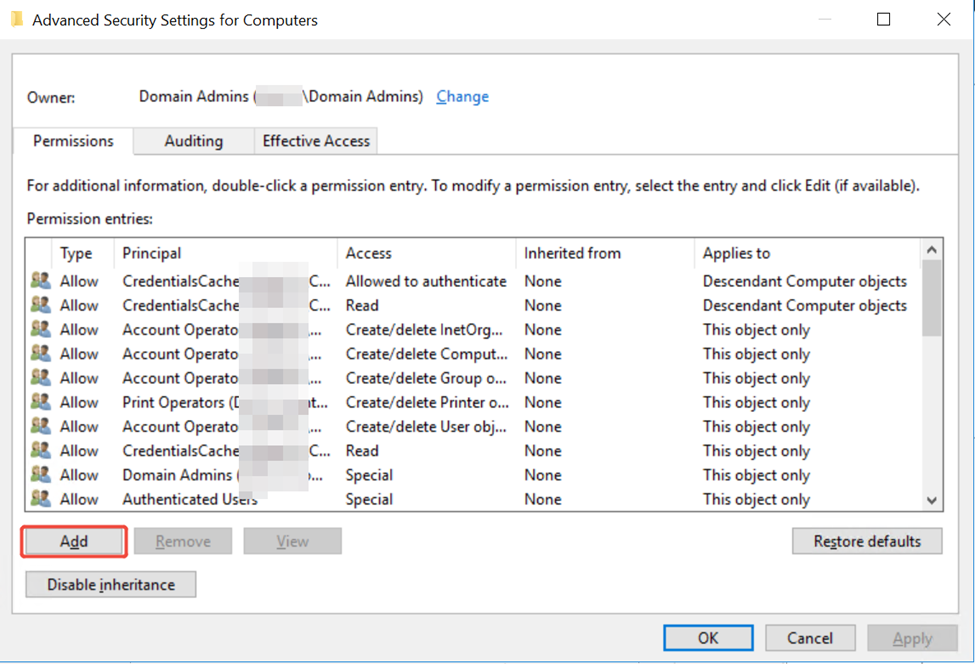
-
Select the created group in Principal section, select Allow in Type section and select Descendant Computer objects in Applies to section. Then select the permission Allowed to authenticate.
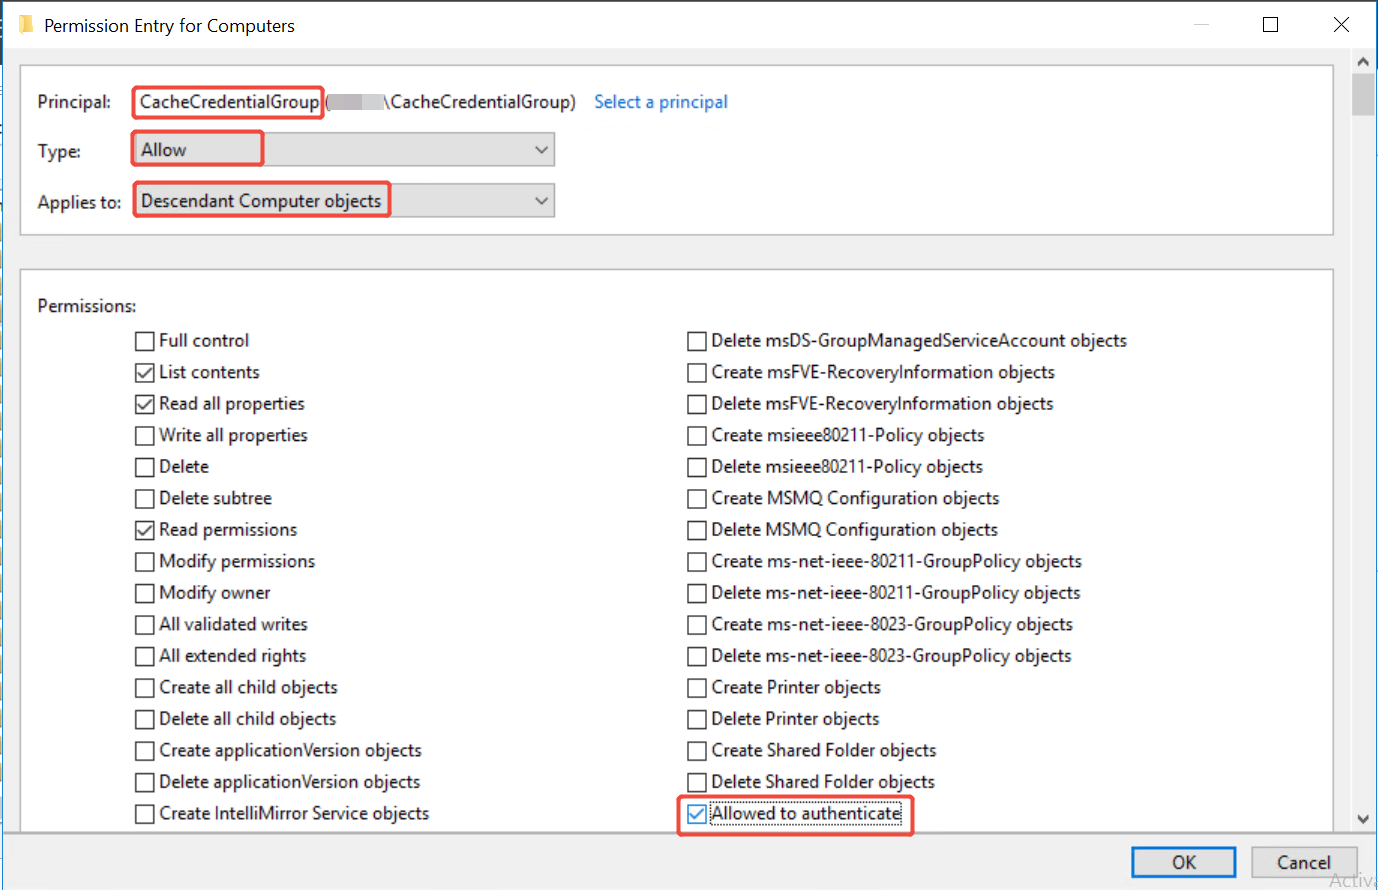
-
Click OK to save.
After allowing cache credential user to authenticate OU of source domain, you can submit cache credentials users.
In the lower-right corner of the device, right-click Fly, click Cache user credential, input your cache credential user and then click Submit.
3. Set destination domain controller IP
Set the correct destination domain controller IP in the device DNS for AD and Hybrid domain rejoin and make sure it can be looked up.
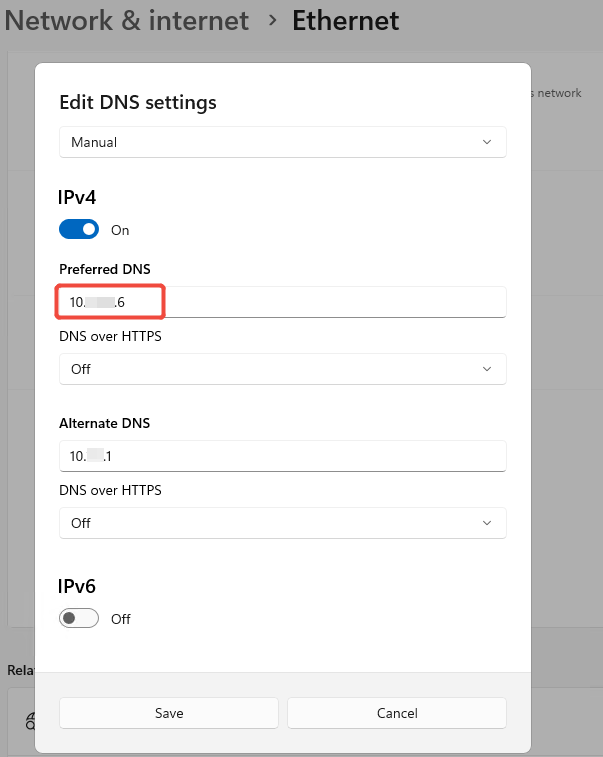
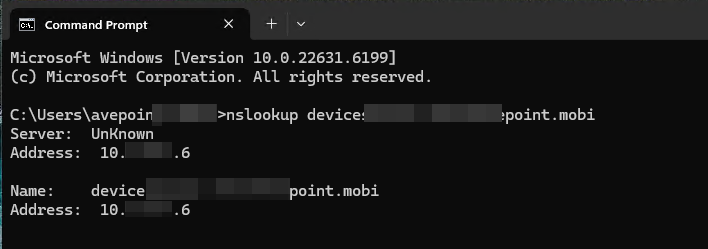
4. Install and Configure Device Agent
4.1 Install Device Agent
Two ways to install Device Agent:
-
Install Device Agent with GPO - IT manager can use Group Policy to remotely install Device Agent for all workstations that do the rejoin domain. Refer to Microsoft documents about how to use the GPO. If you need to install agents with configuration key by command or MST file transform, the key is CONNECTION and the value is your configuration key value of source connection.
-
Install device agent with Intune - Make sure your devices already have joined Microsoft Intune. Refer to Microsoft documents about how to use the Intune. If you need to install agents with configuration key, you can modify the install command:
msiexec /i "AgentName.msi" /qn CONNECTION="ConfigurationKeyValue"when you add an app.
Sign in to your device and refer to the following steps to install device agent:
-
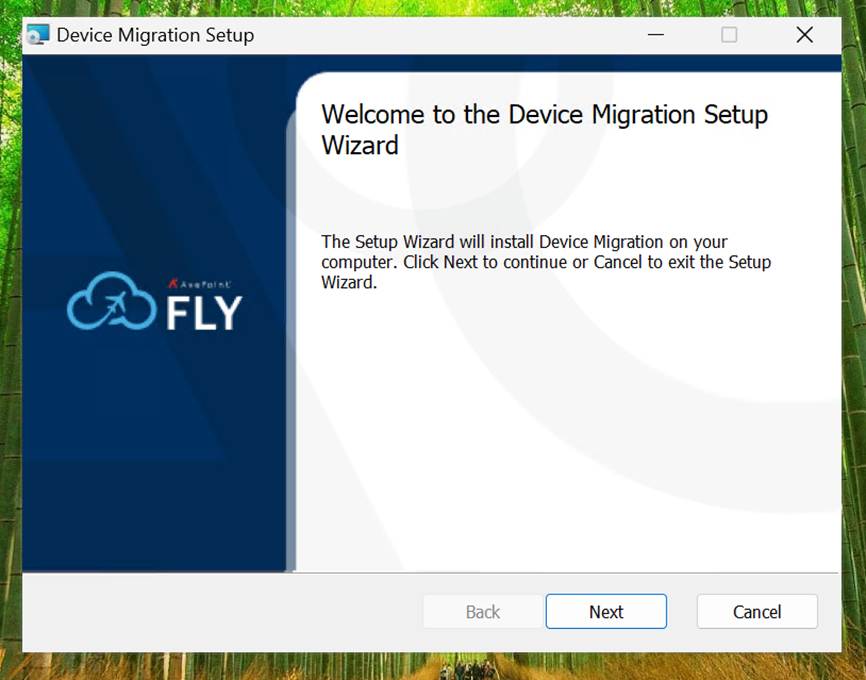
In Welcome to the Device Migration Setup Wizard page, click Next.
-
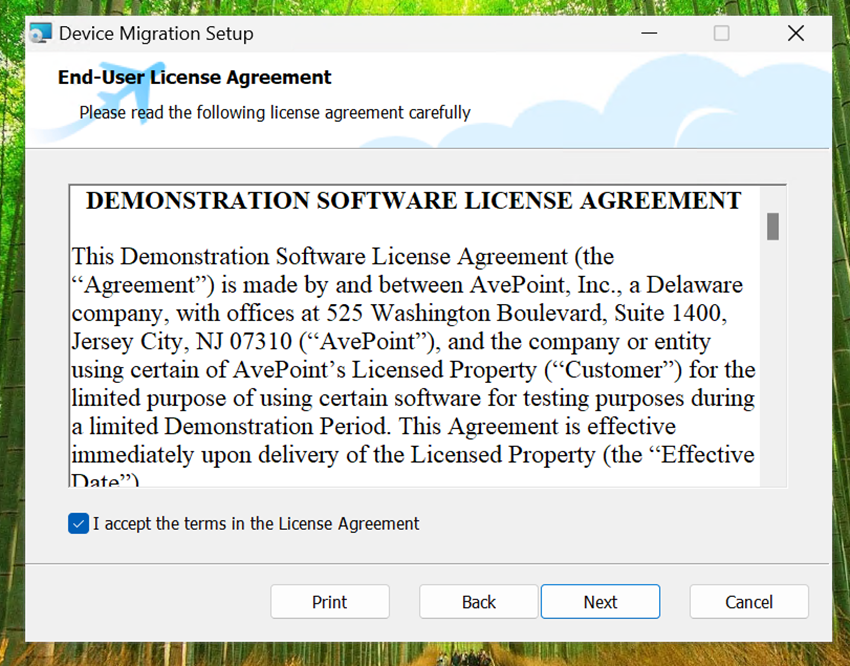
Read the license agreement and select the checkbox to accept it and then click Next.
-
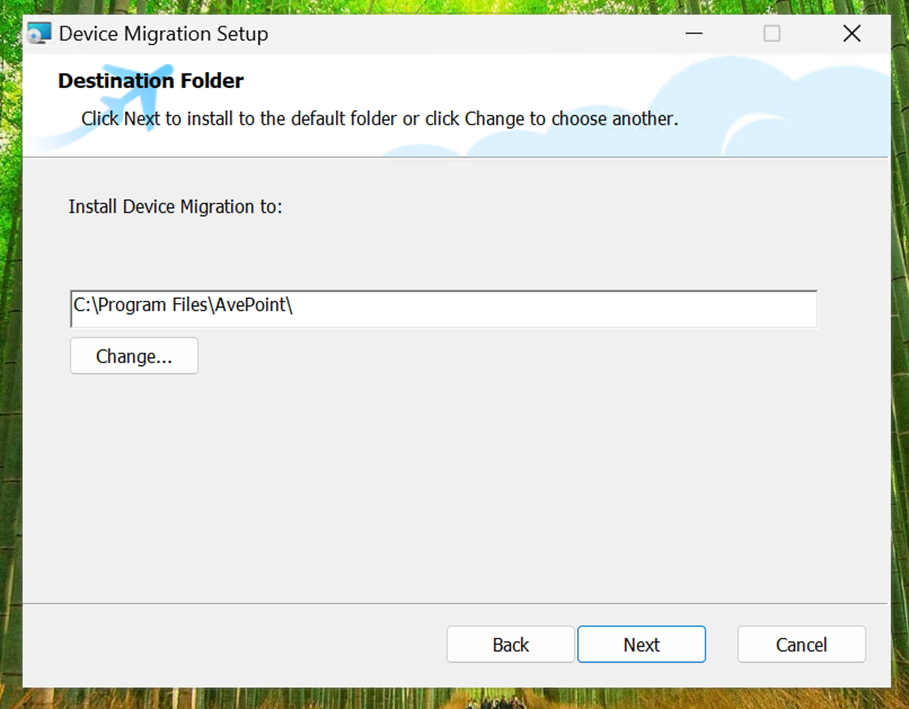
Select the installation path and click Next.
-
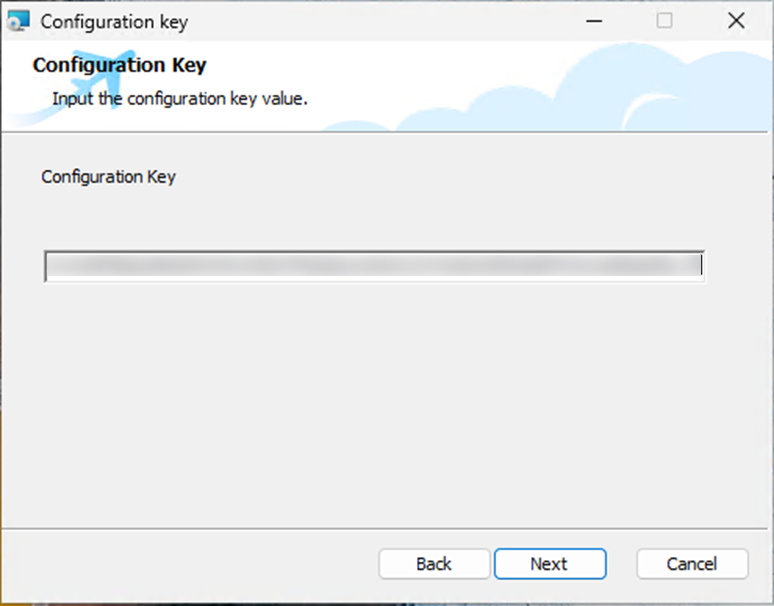
Enter the configuration key of device connection you generated and click Next.
 NOTE
NOTEBy pasting the configuration key generated in the Fly browser into the installer, the Device Agent will automatically configure itself, ready for you to run the device rejoin.
When you open the agent after installation, you will see that all connection fields (AOS and Fly connection) are already filled with the correct values. You can also change the configuration information to connect other connections of Fly and customize Proxy settings if needed. Everything else is ready for you to start the rejoin domain job. -
Click Next to access the Configure Device Migration Agent page.
-
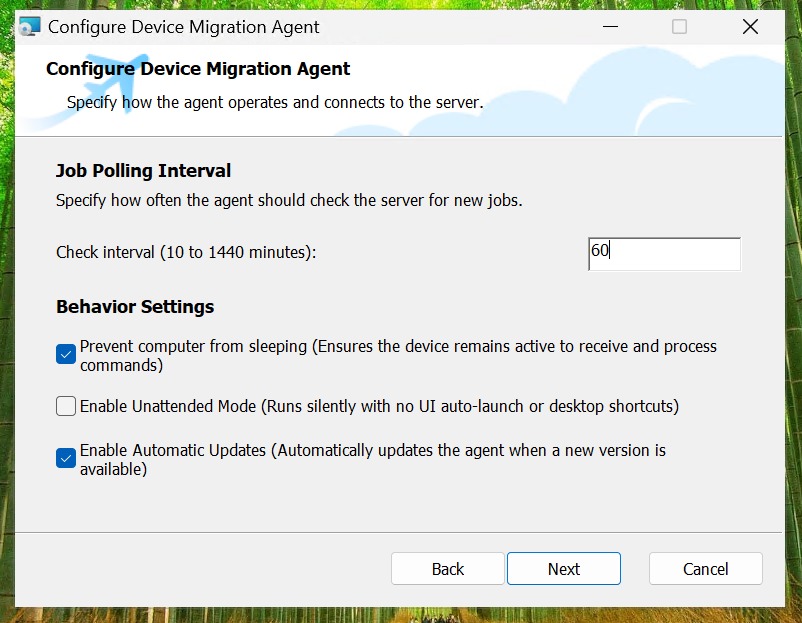
In the Configure Device Migration Agent step, define how the Fly Device Agent behaves locally on the machine and how frequently it communicates with the central migration server.
-
Job Polling Interval – Enter an integer from 10 to 1440 minutes to specify how often the local agent should check the server for new jobs. The default is 60 minutes, meaning the agent checks for new commands/jobs once an hour.
-
Behavior Settings
-
Prevent computer from sleeping – With this checkbox selected, this instructs the device to avoid sleep or hibernation modes. This is a critical setting that ensures the device remains active to receive migration commands, especially during out-of-hours or weekend cutovers.
-
Enable Unattended Mode – With this checkbox selected, the agent installs and runs completely silently in the background. It prevents the application UI from auto-launching and stops the creation of desktop shortcuts, making it ideal for invisible, enterprise-wide deployments where end-users' interaction is not needed.
-
Enable Automatic Updates – With this checkbox selected, the agent will automatically download and apply new version updates as they become available, ensuring the local device always has the latest features and bug fixes without requiring manual IT intervention.
-
-
-
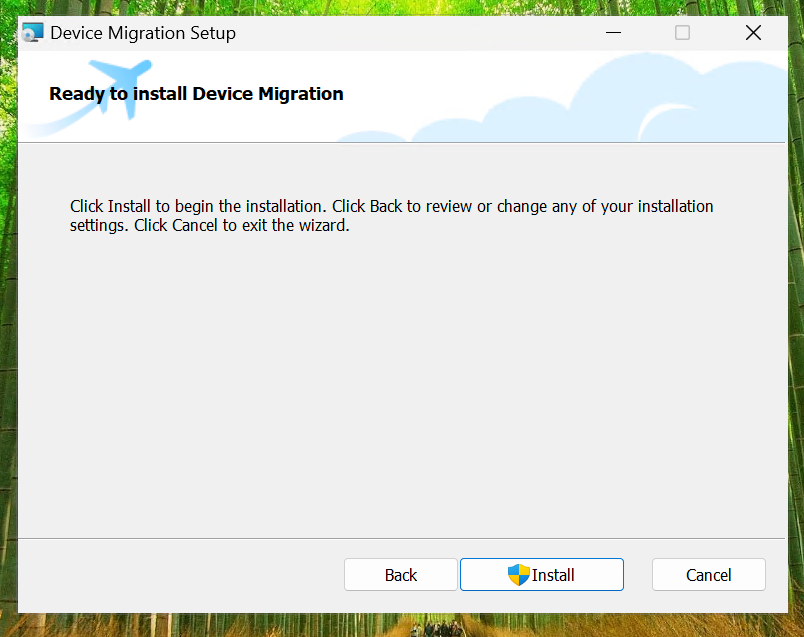
Click Install to begin the installation.
4.2 Configure Device Agent
To ensure your data remains secure and is routed to the correct destination during migration, the Fly Device Agent requires specific authentication credentials.
Refer to the following steps to configure the Device Agent:
-
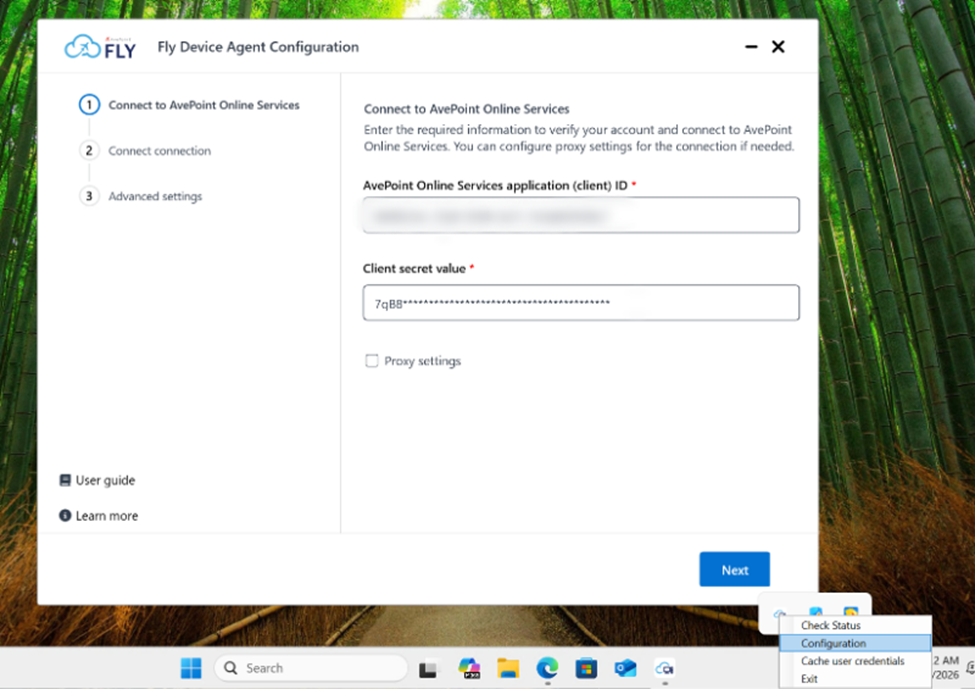
In the lower-right corner of the device, right-click Fly and then click Configuration.
-
Enter the AvePoint Online Services application (client) ID and Client secret and then click Next.
-
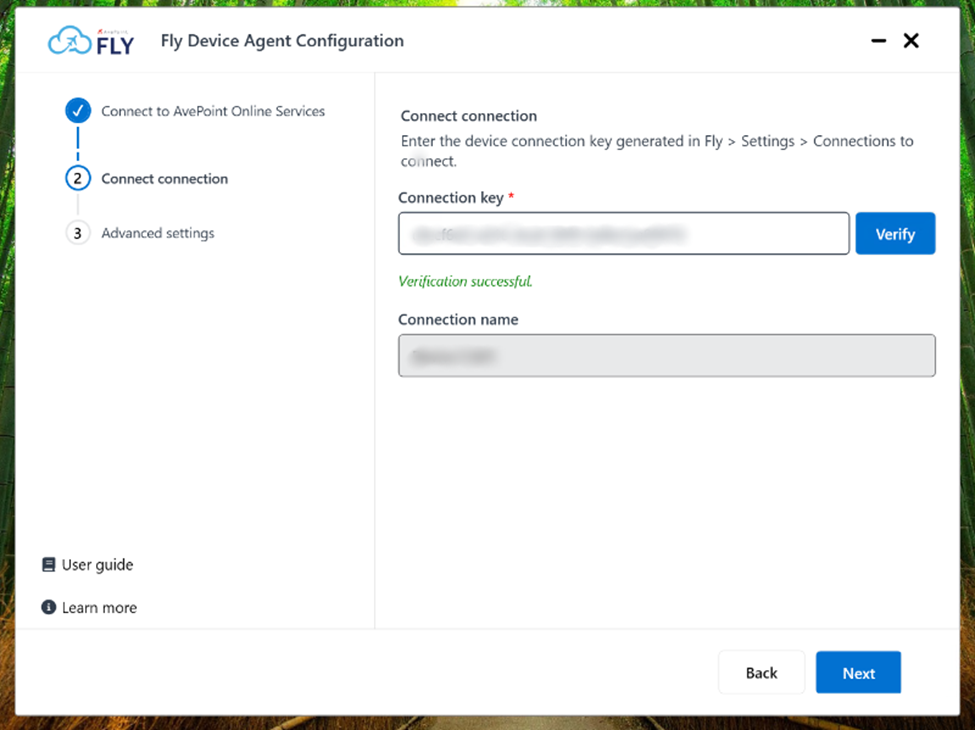
Enter the source device Connection key and click Verify. You can open the device connection of Fly to view the connection key.
-
Configure the Advanced settings for the local device agent if required, including job check frequency and system power overrides.
-
Click Finish.
You can see the device agent in Fly after finishing the above steps.
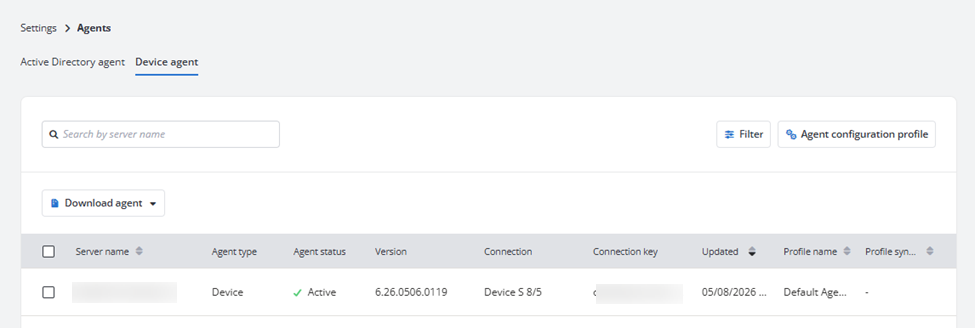
Depending on how you choose to install the Fly Device Agent, you may not see the configuration screens described above.
Unattended Mode Deployments
If the agent is deployed using Unattended Mode, the agent configuration window and the taskbar system tray icon will not be visible on the device.
Unattended mode is specifically designed to run quietly in the background. It ensures that the end-user using the device is not interrupted by configuration pop-ups, system tray notifications, or prompted to enter security credentials they do not have.
The required security settings, AOS Client ID, Client Secret, and Connection Key are still required. However, instead of being typed into a window manually, your administrator will automatically inject these values into the installation using command-line parameters or automated deployment tools like Microsoft Intune or SCCM.
The agent will still authenticate and connect securely to AvePoint Online Services, but the entire process will remain completely invisible to the device owner.
To deploy the Device Agent silently via command line or endpoint management tools (like Microsoft Intune), you can use the following syntax:
msiexec /i "\\SERVER\path\to\package\Fly_DeviceAgent_X.XX.XX.XXXX.msi" /qn UNATTENDED=true CONFIGURATIONKEY=<Your configuration key> JOB_DURATION=<Minutes> AGENTAUTOUPDATE=true|false KEEPAWAKE=true|false
The following parameters are configurable:
UNATTENDED – Set this to true to enable Unattended Mode. The installation and the agent will run entirely in the background without displaying any user interface (UI) to the end-user.
CONNECTION – The configuration key will automatically be retrieved from Fly and provide the used values for Device Agent.
JOB_DURATION – Defines the polling interval (in minutes). This dictates how frequently the Device Agent checks the server for new migration tasks.
5. Create a migration policy
A device migration policy allows you to define the mappings, areas, and areas to ignore. Refer to Create a Migration Policy for details.
The Cache user credential for device logon option here is required for online join method. If you choose to do offline join method, then you will need to configure cache user credential on the Device Agent.
Migration Execution
Refer to the following sections to perform the migration.
1. Create a project
Navigate to Fly > Projects and create a new device migration project. Refer to Create a Project for details.
2. Create migration mappings
Refer to Create Migration Mappings for details.
3. Perform migrations
Refer to Run Migrations for details.
Before starting the migration, ensure that the device network can access the required URLs and that the network connection remains stable during the migration process and after the device restarts.
3.1 Rejoin Domain
Permissions on the source devices are automatically migrated during the migration process.
Refer to the following steps to rejoin the domain:
-
Select the mappings you want to migrate and click Rejoin domain.
NOTEAfter the step is completed, if the device is powered on but no user is signed in, for example, after a restart with no subsequent sign-in, after a user signs out, or after a virtual machine connection is disconnected, Fly will automatically start the migration within 1 hour.
-
In the lower-right corner of the device, right-click Fly and then click Check status or wait for up to one hour. When the job is detected, the Start Rejoin Domain screen appears.
NOTEIf your device joins Active Directory and Entra ID as part of a hybrid identity configuration using the offline method, wait for 10 minutes, and then click Check status, or just wait up to one hour.
-
Click to start performing migration.
3.2 Migrate Permissions
After the domain rejoin is complete, select the mapping and click to migrate permissions.
In the lower-right corner of the device, right-click Fly and then click Check status or wait up to one hour to migrate permissions.
4. End User Actions Required on the Device
4.1 During the Device Migration
The actions required depend on whether the user chooses to force the cutover or allow the device's end user to control it.
-
Manual Rejoin - The Fly Device Agent will display a pop-up window on the user's desktop notifying them that their device is ready to start the migration.
The user must save all open documents, close their applications, and manually click Rejoin or Restart on the prompt.
Once the computer restarts, the user must log into the Windows lock screen using their new destination account credentials.
-
Automatic Rejoin (Unattended mode and Force rejoin configured) - The Fly Device Agent will display a mandatory countdown timer on the screen alerting the user that a system restart is imminent.
The user must save their work and close applications before the timer expires. Once the timer hits zero, the computer will automatically force a restart, interrupting any active work.
Once the computer restarts, the user must log into the Windows lock screen using their new destination account credentials.
4.2 App Reconfiguration
Depending on the app reconfiguration settings, the user may see setup prompts to sign in to their Microsoft 365 desktop apps, such as Teams, OneDrive, and Outlook, using their new destination credentials.
If users select automated app reconfiguration in Fly, Fly reconfigures the apps in the background. However, because Fly cannot bypass security protocols such as Multi-Factor Authentication (MFA), users must still provide their credentials to complete the setup.
-
Outlook – Select this to automatically reconfigure Microsoft Outlook. You can also choose to enable silent reconfiguration to minimize user interaction.
-
OneDrive – Select this to automatically reconfigure Microsoft OneDrive.
You can select Free up local OneDrive space (Cloud-only) to free up local disk space by removing the local copy of downloaded files while keeping them available online in OneDrive. Any un-synced local files are automatically preserved in a Legacy destination folder to ensure zero data loss.
You can also configure whether to enable silent reconfiguration, which will reconfigure OneDrive with minimal user interaction.
-
Teams – Select this to automatically reconfigure Microsoft Teams.
If users choose not to automatically reconfigure applications in Fly, they must manually set up the destination accounts for each app. This process may include creating a new Outlook mail profile, linking the new email address, waiting for the mailbox to sync, unlinking the old OneDrive tenant, connecting the new OneDrive account, and signing out of applications.