
Home > Exchange Online to Exchange Online Migration Process
Download this articleExchange Online to Exchange Online Migration Process
The sections below contain the general migration process for Exchange Online Migration with different domains in the source and destination. The details outlined in this document can also serve as general guidelines for any email source migrated into Exchange Online with some minor adjustments.
More steps may be needed and some steps included in the process may be optional according to your migration requirements.
Preparation
Before the migration, you need to identify what object types you want to migrate. Refer to the Supported and Unsupported List.
1. Create an app profile with required permissions
To connect Fly to your Exchange Online, we recommend creating an app profile with the required permissions in AvePoint Online Services. Refer to Required Permissions to check the required permissions for Exchange Online Migration.
2. Run the source tenant discovery (optional)
Before you migrate from Exchange Online, you can run a tenant discovery for Exchange Online to scan and report the object count, object type, object size, and other details. According to the discovery reports, you can better understand your source environment and plan for your migrations. Refer to user guide for Tenant Discovery for details.
3. Mailboxes filters (optional)
If there are a large number of mailboxes in your tenant and you only want to migrate some of them, you can refer to Microsoft document to specify the mailboxes you want to migrate or the mailboxes that will not be migrated using Exchange PowerShell.
4. Create users in destination tenant
Add new Microsoft 365 users or synchronize users from the local Active Directory to Microsoft 365.
-
If the source domain will be moved to the destination environment:
It is recommended that you use the default email address (user@contoso.onmicrosoft.com) in migration projects. Or you can use email addresses ending with an owned domain. After the domain name of your source tenant is changed to your destination tenant for go-live, if the final incremental migration is needed, use Change mapping domain in Fly to update the email addresses in projects in bulk.
-
If the source domain will not be moved to the destination environment, you can just use different email addresses when configuring mappings in migration projects.
Refer to the user guide about how to prepare users.
5. Create mailboxes for users
Assign licenses to destination users to create mailboxes. Refer to Assign Microsoft 365 licenses to users for details.
6. Provision shared and resource mailboxes
Provision resource mailboxes and shared mailboxes (if needed) in the destination. If the shared mailbox or resource mailbox in the destination does not exist, Fly can create a new one.
7. Handle large mail items for migration to destination mailboxes
-
Microsoft sets a default limit of 35 MB as the maximum size of a received message. We recommend increasing this to 150 MB before the migration to avoid any potential exceptions. Refer to larger email messages to configure the limit.
Sample PowerShell command:
Set-Mailbox -Identity user@contoso.com -MaxReceiveSize 150MB -
Other limits such as rule quota limitation. Inbox rules are limited to 256 KB for all rules. Refer to Modify the space used by Inbox rules in Exchange Online to configure the limit.
Sample PowerShell command:
Set-Mailbox -Identity user@contoso.com -RulesQuota "<32 KB to 256 KB>"
8. Disable litigation hold and single item recovery
During migrations, if you need to repair the migrated data and overwrite many items, we recommend that you disable both litigation hold and single item recovery on related destination mailboxes. If litigation hold or single item recovery is enabled, when items are deleted or overwritten, Exchange will automatically move those items to the Recoverable Items folder and take up storage there.
Litigation hold is not enabled by default while single item recovery is.
Refer to In-Place Hold and Litigation Hold in Exchange Online and Enable or disable single item recovery for a mailbox in Exchange Online for details.
Sample PowerShell Command:
Set-Mailbox -Identity user@contoso.com -SingleItemRecoveryEnabled $false -LitigationHoldEnabled $false
9. Check destination retention policies
If retention policies are configured for the source data, check to make sure the destination retention policies are the same as the source retention policies. Otherwise, the destination data may be deleted due to different retention policies.
10. Throttling limits
Microsoft uses throttling to manage Microsoft 365 operations and throttling limits will affect migration performance. Go to the Microsoft 365 admin center to lift the throttling restrictions.
-
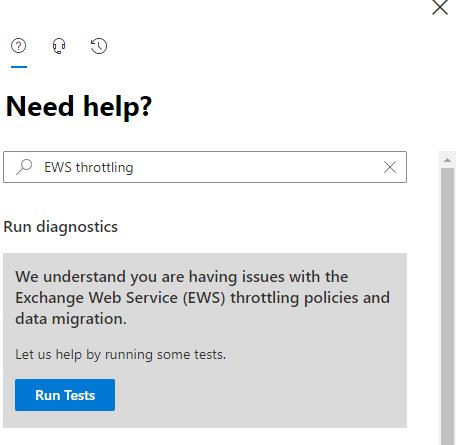
Go to the Help (?) section of the Microsoft 365 admin center.
-
Enter EWS throttling as the search phrase.
-
Click Run Tests when you are asked to check your environment. Essentially, the tests check what EWS throttling applies to the tenant.
-
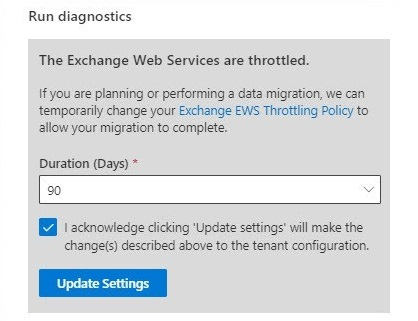
The support assistant checks the tenant settings and concludes that EWS is throttled (the normal situation). You will then be offered the chance to update the settings to the tenant EWS policy to lift throttling for 30, 60, or 90 days.
-
Select a number of days to adjust the policy, and then click Update Settings.
-
After a short delay, the support assistant will confirm that the settings have been changed.
11. Prepare sensitivity labels in destination (optional)
To keep the source sensitivity labels applied on emails in the source tenant to the destination, before the migration, you need to create and publish the sensitivity labels in the destination. Refer to Create and publish sensitivity labels for details.
12. Migration throughput
For email migrations, a reasonable migration speed for EWS is generally 1.5 GB/hour per mapping. The number of mappings that can be run is automatically allocated based on the subscription you purchased. The more user seats you purchase, the more mappings you can run within a project.
For the Graph API, a reasonable migration speed is 1.1 GB/hour per mapping. This performance was measured using simulated customer data. As the Graph API continues to evolve, this performance will continue to be tracked in future versions.
There are many factors which may affect migration performance:
-
The above throughput number is for full migration. Generally, it may be lower for incremental migration since Fly needs to spend quite some time in checking the migrated item status for incremental migration.
-
There may be throttling issues in the source and destination, which affect the migration performance.
13. Create source and destination connections
Refer to Create a Connection to connect Fly to your source and destination Microsoft 365 tenants.
Project setup
Generally, we recommend that you create a project based on the business unit, such as divisions. Also, we recommend that you configure different types of mailboxes in different mapping files.
Other setup
Set mailbox mapping files and user mapping files (optional).
14. Design the migration policy
An Exchange Online migration policy allows you to configure the migration scope of objects, conflict resolutions, user mappings, and advanced options for Exchange Online migrations. Refer to Configure a Migration Policy for details.
There are some notes that need your attention:
-
If the source or destination mailbox is a Microsoft 365 Group mailbox or archive mailbox, the Auto-Complete Lists cannot be migrated.
-
If you select to migrate Recoverable Items folders, only the Deletions folders are supported to be migrated.
-
To migrate archive mailboxes, make sure the archive mailboxes exist in the destination.
-
Synchronize deletion is unavailable for folder level migration jobs.
15. Understand when destination users will receive notifications
After calendar permissions are migrated to the destination, notifications will be sent to the shared users. Users must log in to their mailboxes and accept the shared calendars to view them.
16. Plan a pilot run
We recommend that you perform a pilot run for the following purposes:
-
Get familiar with Fly interface and understand the whole migration process.
-
Discover any potential issues early and resolve them before production migration.
-
Understand the throttling situation in case the content size is large, and then try to resolve with source and destination.
Migration Execution
Refer to the following sections to execute the migration.
1. Configure projects and mappings in Fly
To configure projects and mappings, refer to Create a Project and Create Migration Mappings for details.
To migrate Recoverable Items folders, note the following:
-
If you want to migrate only the data in SubstrateHolds, Versions, Purges, and DiscoveryHolds folders, configure the MigrateLegalHoldFolder customized feature in the migration policy. Refer to Customized Features for Exchange Online Migration for details.
-
If you want to migrate Deletions folders, select the Recoverable Items folders option in the migration policy and make sure the MigrateLegalHoldFolder customized feature is not configured.
2. Perform regular full migrations
Before running the job, we recommend you verify the mappings to ensure that the mappings are available for migration. Refer to Pre-analyze Mappings for details.
Then you can run a full migration job to migrate the objects based on your configured migration policy. Refer to Run Migrations to Migrate Objects for details.
3. Perform regular incremental migrations
Handle new, updated, and failed data. Refer to Run Migrations to Migrate Objects about how to perform regular incremental migrations.
4. Add X500 email addresses to the destination
In some cases following migration, end users may be unable to update events. When migrating auto-complete lists, there can be LegacyExchangeDN entries from source mailboxes. If end users directly use migrated auto-complete lists when sending emails, the emails may not be sent, and end users will get a non-delivery report (NDR).
The issues above can be resolved by adding the X500 email address to destination mailboxes. To add X500 email addresses to the destination, refer to User Guide for details.
You only need to add X500 email addresses to the destination in the current migration wave.
5. Validate migration results
Check the following:
-
Mapping report. If the mapping fails or finishes with exceptions, you can check the error code and comment for the mapping in the Migration error section. You can click the error code to view the details and recommendations of the code in the Troubleshooting Guide, which can assist you in resolving or avoiding the error.
-
Migrated data in the destination.
-
Item count and permissions in the destination.
-
Linkage between the organizer and the attendee.
-
Linkage between users already migrated to the destination with users still in the source due to multiple-wave migration via forwarding setup at both sides.
-
New data can be created in destination mailboxes.
-
Functions can work normally, such as mail reply, forward, etc.
-
Meeting/recurrence meeting functions work normally.
6. (Cutover) Configure email forwarding for coexistence
Email forwarding is needed if there are additional waves to be migrated.
The email forwarding needs to be enabled in both source and destination:
-
Set up two-way forwarding
-
For all source users migrated to destination, forward from source to destination.
-
For all source users to be migrated to destination, forward from destination to source.
-
At each wave, you need to alter forwarding for those users migrated over at this wave.
-
This forwarding can be set before the wave starts if needed.
-
-
-
Set up global contacts
-
Set up new email addresses in the destination for all users migrated over as global contacts in the source tenant.
This is to allow calendar updates from the organizer who is already migrated to the destination tenant.
-
Set up all source users as global contacts in the destination tenant.
This is to allow calendar updates from the organizer still in the source to attendees who are already migrated to the destination tenant.
-
Forwarding Setup in Microsoft 365
By default, Microsoft 365 will block forwarding outside the organization. To make sure forwarding is working, modify the Outbound spam filter policy in Anti-spam settings and set automatic forwarding to On to allow users to automatically forward messages outside the organization. Refer to control automatic external email forwarding in Microsoft 365 for details.
To set email forwarding, you can select Email forwarding in Post-migration, or use the following PowerShell command:
Set-Mailbox -Identity user@contoso.com -DeliverToMailboxAndForward $false -ForwardingSMTPAddress "user@anothercontoso.com"
Refer to configure email forwarding for a mailbox for details.
7. Hide/unhide users’ email addresses from the destination global address list
When the source mailboxes are still in use, and destination mailboxes are not put in use, you can hide users’ email addresses from the destination global address list to avoid destination users from viewing the newly added email addresses in the global address list. Refer to the step 6 in Prepare for Migrations for details. You can also unhide users’ email addresses from the global address list when the migration of source mailboxes is finished, and the destination mailboxes are ready for use. Refer to Unhide Users’ Email Addresses from the Destination Global Address List (GAL) for details.
8. Perform the final incremental migrations for current wave
Ensure all source data are migrated to the destination.
9. Perform migrations for all other waves
This step is only needed if you have separated the migration plans into multiple waves.
10. Reduce DNS TTL
It is recommended to reduce the DNS time-to-live (TTL) to one hour or below to reduce the delay of emails sent from people outside of the organizations on cutover.
11. Perform the final cutover
Remove all forwardings, modify Exchange MX records, etc. It can take up to 72 hours (related to the TTL mentioned in the previous section) for your email systems to recognize the changed MX records. After the cutover, the email addresses in project mappings will be changed. If you want to run a final incremental job to ensure updates of source data are migrated to the destination, you can use Change mapping domain in Fly to modify the email addresses in project mappings.
If you have run a full or incremental migration job for mailboxes and then changed the prefixes or domain names of mailbox addresses in the source or destination tenant (for example, you have migrated userA@src.com to userA@dest.com and then changed the source tenant domain name from src.com to newsrc.com), the subsequent migration jobs (full or incremental jobs) will not fail even if you do not change the prefixes or domain names of source or destination email addresses configured in project mappings. This is because Fly now uses mailbox IDs to migrate mailboxes.
12. Post migration
When all data has been migrated to the destination, you can run a post migration job to migrate shared calendar permissions to make sure the shared users can manage the migrated shared calendars in the destination. Refer to Post-migration for details.
After calendar permissions are migrated to the destination, notifications will be sent to the shared users. Users must log in to their mailboxes and accept the shared calendars to view them.