
Home > Microsoft 365 Groups to Microsoft 365 Groups Migration Process
Download this articleMicrosoft 365 Groups to Microsoft 365 Groups Migration Process
The sections below contain the general migration process for Microsoft 365 Groups to Microsoft 365 Groups Migration. The details outlined in this document can serve as general guidelines with some minor adjustments.
More steps may be needed, and some steps included in the process may be optional according to your migration requirements.
Preparation
Before the migration, you need to think about what object types they want to migrate. Refer to the Supported and Unsupported List.
1. Create a service account or app profile with required permissions
To connect Fly to your Groups, create a service account or an app profile with the required permissions in AvePoint Online Services. In general, you need to grant the following required permissions to the service account before the migration:
-
Group Owner and Member
-
Mail Recipients roles
-
License for Exchange Online
Refer to Required Permissions to check the required permissions for Microsoft 365 Groups to Microsoft 365 Groups Migration.
2. Run the source tenant discovery (optional)
Before you migrate from Microsoft 365 Groups, you can run a tenant discovery of Microsoft 365 Groups to scan and report the object count, object type, object size, and other details. According to the discovery reports, you can better understand your source environment and plan for your migrations. Refer to the user guide for Tenant Discovery for details.
3. Create users in destination tenant or sync AD users
User mappings are required when executing migrations. Make sure users of the following data are created in the destination tenant before the migration.
-
Group Membership
-
Task: Assign To
-
Mail: To, Cc, Bcc, Senders, etc.
-
File: Modified by, Created By, Shared link
-
Permission
-
Other data that needs users
Refer to the user guide about how to prepare users.
4. Assign license to users
If you want Fly to assign the Group Owner role to destination users in the migration, the users must have Microsoft 365 licenses. We recommend that you assign Microsoft 365 licenses to all destination users for easy use.
5. External users
External users cannot be migrated in the migration. You can export external users and import them into the destination tenant prior to the migration.
Refer to the following steps to export external users and import them into the destination tenant:
-
Make sure you have the Azure AD PowerShell Module installed before running the scripts. See instructions here.
-
Run the PowerShell script to export the external users from the source tenant to a CSV file. (You can click the link to download the script.)
-
Run the PowerShell script to import the users in the CSV file to the destination tenant. (You can click the link to download the script.)
6. Create Groups in destination tenant (optional)
Fly can create Groups in the destination with the default domain of the destination tenant. If you want to create Groups without the default domain of the destination tenant, or you want to migrate to existing Groups, you can create Groups in the destination before the migration.
7. Handle large mail items for migration to destination mailboxes
Microsoft sets a default limit of 35 MB as the maximum size of a received message. We recommend increasing this to 150 MB before the migration to avoid any potential exceptions. Refer to larger email messages to configure the limit.
Sample PowerShell command:
8. Check destination retention policies
If retention policies are configured for the source data, check to make sure the destination retention policies are the same as the source retention policies. Otherwise, the destination data may be deleted due to different retention policies.
9. Throttling limits
Microsoft uses throttling to manage Microsoft 365 operations and throttling limits will affect migration performance. Go to the Microsoft 365 admin center to lift the throttling restrictions.
-
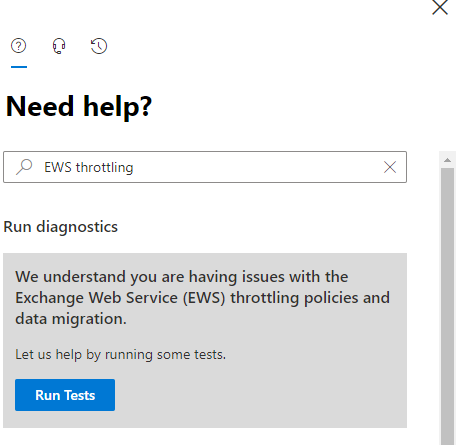
Go to the Help (?) section of the Microsoft 365 admin center.
-
Enter EWS throttling as the search phrase.
-
Click Run Tests when you are asked to check your environment. Essentially, the tests check what EWS throttling applies to the tenant.
-
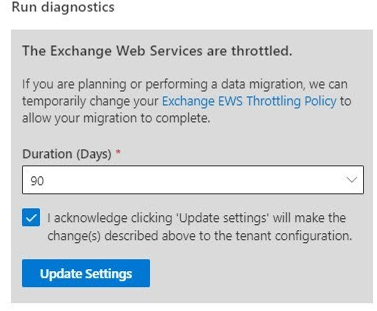
The support assistant checks the tenant settings and concludes that EWS is throttled (the normal situation). You will then be offered the chance to update the settings to the tenant EWS policy to lift throttling for 30, 60, or 90 days.
-
Select the number of days to adjust the policy, and then click Update Settings.
-
After a short delay, the support assistant will confirm that the settings have been changed.
10. Prepare sensitivity labels in destination (optional)
If the source tenant does not have sensitivity labels, you can ignore this step.
If the source tenant has sensitivity labels, and you want to keep the source sensitivity labels applied on Groups/emails/files to the destination, you need to create and publish the sensitivity labels in the destination before the migration. Refer to Create and publish sensitivity labels for details.
11. Create source and destination connections
Refer to Create a Connection to connect Fly to your source and destination Groups. The connection including both the app profile and service account is recommended.
12. Migration throughput
In Microsoft 365 Groups to Microsoft 365 Groups migrations, the job speed depends on the size of SharePoint team sites and the size of Group mailboxes.
SharePoint Site Migration Throughput
Generally, a reasonable SharePoint site migration speed is about 2 GB/hour/mapping. The number of mappings that run in parallel is automatically allocated based on your purchased subscription. The more subscriptions you purchase, the more mappings you can run in parallel.
Mailbox Migration Throughput
Generally, a reasonable migration speed of the mailbox is 1.5 GB/hour/mapping. The number of mappings that run in parallel is automatically allocated based on your purchased subscription. The more subscriptions you purchase, the more mappings you can run in parallel.
We can calculate how much content can be migrated with the above infrastructure.
There are many factors which may affect the migration performance:
-
The above throughput number is for the full migration. Generally, it may be lower for the incremental migration since Fly needs to spend quite some time checking the migrated items’ status for the incremental migration.
-
The above results are only ideal values after many tests. The migration speed of different tenants may be different. We recommend that you estimate the daily throughput in the same way as the results of the pilot job.
-
If your Planner is particularly large, the overall migration speed may be slowed down.
13. Prepare mapping files
Configure Groups mapping files and user mapping files:
-
Examples in the Group mapping file

-
Examples in the user mapping file

14. Design the migration policy
A Microsoft 365 Groups to Microsoft 365 Groups migration policy allows you to define the migration scope of group objects, the conflict resolutions, whether to replace source email addresses/meeting links with destination, how to map users, and how to manage the sensitivity labels of files/emails/Groups for Microsoft 365 Groups to Microsoft 365 Groups migrations. Refer to Create a Migration Policy for details.
15. Understand when destination users will receive notifications
In some situations, destination users will receive email notifications when they are added to destination Groups or source objects are migrated to destination users.
Full/Incremental migration job
The table below shows specific situations when destination users will be notified.
The notification results are the same for the following destination connection types:
- Service account authentication only
- App profile only
- Service account authentication and app profile
| Notification Type | User Type | Notification Results |
|---|---|---|
| Welcome Email | Internal User | 1. If the destination Groups are newly created by Fly during the migration, Fly will disable the welcome emails and the destination users will not receive any welcome emails when they are added to destination Groups. 2. If the destination Groups already exist before the migration, Fly will not disable the welcome emails for the destination users. You can manually disable welcome emails for them. Refer to Disable welcome emails (optional) for details. |
| Welcome Email | Guest User | 1. If the destination Groups are newly created by Fly during the migration, Fly will disable the welcome emails and the destination users will not receive any welcome emails when they are added to destination Groups. 2. If the destination Groups already exist before the migration, Fly will not disable the welcome emails for the destination users. You can manually disable welcome emails for them. Refer to Disable welcome emails (optional) for details. |
| Task Comment Email | Internal User | Will not receive notification. |
| Task Comment Email | Guest User | 1. Wil receive notification if you select the Membership option in the migration policy. 2. Will not receive notification if you deselect the Membership option in the migration policy. |
| Task Assign Email | Internal User | Will receive notification. |
| Task Assign Email | Guest User | Will not receive notification. |
Migrate membership job
The table below shows specific situations when destination users will be notified.
| Notification Type | User Type | Migrate Membership Job |
|---|---|---|
| Welcome Email | Internal User | 1. If the destination Groups are newly created by Fly during the migration, Fly will disable the welcome emails and the destination users will not receive any notifications when they are added to destination Groups. 2. If the destination Groups already exist before the migration, Fly will not disable the welcome emails for the destination users. You can manually disable welcome emails for them. Refer to Disable welcome emails (optional) for details. |
| Welcome Email | Guest User | Will not receive notification. |
Disable welcome emails (optional)
Generally, users will receive welcome emails if they are added as members of a Microsoft 365 Group. If the destination Groups are newly created by Fly in the migration, Fly will disable the welcome emails by default to avoid interruption. However, if the destination Groups already exist before the migration, Fly will not disable the welcome emails. You can manually disable the welcome emails.
To execute this PowerShell command, the following additional roles are required:
- ApplicationImpersonation
- Mail Recipients
Even if you disable the email notification, the tasks’ Assign to users will receive the notification when the tasks are migrated to the destination.
Refer to the following steps to disable or enable the welcome emails:
-
Install the Exchange Online PowerShell V3 module to the server where you will run the DisableAndEnableGroupWelcomeEmail.ps1 file. Refer to Install Exchange Online PowerShell V3 module for details.
-
Connect the Exchange Online PowerShell V3 module to Exchange Online. Refer to Connect to Exchange Online for details
-
Download the GroupWelcomeEmail.zip, and extract the ZIP file to a location with a network connection.
-
In the extracted tool folder, open the Template.csv file, and configure the email addresses of Groups for which you want to disable welcome emails.
-
Right-click the DisableAndEnableGroupWelcomeEmail.ps1 application file, and select Run with PowerShell.
-
Enter your credentials, and click OK to open the PowerShell window.
-
Enter the full path of the CSV file configured in step 4, and press Enter on the keyboard.
-
To disable the notifications, enter option 1 and press Enter on the keyboard.
To enable the notifications, enter option 2 and press Enter on the keyboard.
16. Plan a pilot run
We recommend you perform a pilot run for the following purposes:
-
Get familiar with the Fly interface and understand the whole migration process.
-
Discover any potential issues early and resolve them before production migration.
-
Understand the throttling situation in case content size is large, and then try to resolve with destination.
Migration Execution
Refer to the following sections to execute the migration.
1. Configure projects and mappings in Fly
To configure projects and mappings, refer to the Create a Project and Create Migration Mappings for details. Use the mapping file of data to be migrated to configure the migration project.
2. Perform regular full migrations
Before running the job, we recommend you verify the mappings to ensure that the mappings are available for migration. Refer to Pre-analyze Mappings for details.
Then you can run a full migration job to migrate the objects based on your configured migration policy. Refer to Run Migrations to Migrate Objects for details.
3. Perform regular incremental migrations
Some issues may occur during a full migration job. Run an incremental job to handle new, updated, and failed data. Refer to Run Migrations to Migrate Objects about how to perform regular incremental migrations.
4. Communicate with end users (optional)
Notify end users of the migration schedule. Publish a message in each source Group to inform end users that they can run incremental jobs before final validation.
5. Perform the final incremental migration and migrate membership
Notify all users and make sure the source Groups do not have any new/modified objects. Then perform the final incremental migration job.
After you complete your migrations, if the source membership is not included in the migrations, to make the destination Group available for users, run a Migrate membership job to only migrate the source membership, including owners, members, and guests. Refer to the Migrate Membership section for details.
6. Compare the source and destination storage (optional)
After the migration, you can compare the number and size of files in the source and destination team sites by accessing the following URL:
sitecollectionurl/_layouts/15/storman.aspx
-
If the number of files is different after the migration, check if the files that are not in the destination are migrated. If the files have not been migrated, check the comments of error files. After you fix the errors, rerun the migration job. If there are no records for these files, contact Support and provide the screenshots of these files and job ID to analyze the error.
-
If the size of files is different after the migration, for example, the source file size is 10 MB, but the migrated file size is 100 MB, check the actual size of the source and migrated files in the source and destination libraries. Then, refer to the following instructions to resolve this issue:
-
If the actual size of the source file is 10 MB, the actual size of the migrated file is 10 MB, but the migrated file size displayed in the destination Storage Metrics page is 100 MB, it may be an issue of Microsoft.
-
If the actual size of the source file is 100 MB, the actual size of the migrated file is 100 MB, but the source file size displayed in the Storage Metrics page is 10 MB, it may be an issue of Microsoft.
-
If the actual size of the source file is 10 MB but the actual size of the migrated file is 100 MB, it is an issue of Fly. Contact Support and provide the screenshots of version histories of the source and migrated files, and screenshots of the Storage Metrics pages of the source and destination by accessing the following URL to analyze the error:
sitecollectionurl/_layouts/15/storman.aspx
-
7. Validate migration results
Note the following items during the validation period:
-
Number of files
-
Number of mails in Group mailbox
-
Number of planners and tasks
-
No failed data in job report
8. Perform migrations for all other waves (optional)
This step is needed only if you have separated the mappings into multiple waves.
9. Perform the final incremental migration for other waves (optional)
You can perform the final incremental migration to make sure all source data are migrated to the destination if needed.
10. Perform the final validation
During the final validation, you should validate members of destination Groups.
11. Change domain
After you finish your migrations for the current wave, if you need to keep the source domain to the destination, you can change the domains of your source and destination environments.
Refer to the following steps for details:
Refer to the following steps for details:
-
Remove the domain from the source tenant.
-
To remove a domain from a Microsoft 365 tenant, refer to the Microsoft Document.
-
Add the domain to the destination tenant.
To add a domain to a Microsoft 365 tenant, refer to the Microsoft Document.
-
Add the new destination email address as an alias of the destination user and set the new email address as the primary email. This ensures the destination users can use the new email addresses.
-
Then, if you want to perform a final incremental migration to migrate the new or modified data to the destination, you must update the domain names of source and destination Group email addresses in Fly first. Refer to the user guide for Change Mapping Domain for details.