
Home > Terms and Rules > Manage Terms
Download this articleManage Terms
In Terms and rules > Terms, you can create and manage the term hierarchy used to classify content across your content sources. Terms are a core component of content lifecycle management only; they do not apply to the storage optimization or discovery and analysis modules. You can create term groups, term sets, and terms, then associate rules with terms to control how classified content is handled.
Create Terms
Use the following procedures to create term groups, term sets, and terms.
Create a term group
- Click the down arrow next to the built-in Term groups node, then select Create term group.
- A text box appears below the node.
- Enter a name for the term group, then press Enter.
- Repeat these steps to create additional term groups.
Create a term set
- Click the down arrow next to a term group, then select Create term set.
- A text box appears below the selected term group.
- Enter a name for the term set, then press Enter.
- Repeat these steps to create additional term sets.
Create a term
- Click the down arrow next to a term set or existing term, then select Create term.
- A text box appears below the selected node.
- Enter a name for the term, then press Enter.
- Repeat these steps to create additional terms.
Manage Existing Terms
Search for a term
To find a specific term, enter the term name, description, or related rule name in the Search box, then click Search.
Rename a term
To rename a term group, term set, or term:
- Click the down arrow next to the item.
- Select Rename term group, Rename term set, or Rename term.
- Enter the new name and press Enter.
You can also double-click the term group, term set, or term name to edit it directly.
Retire a term
To retire a term, click the down arrow next to the term and select Retire term.
After a term is retired, you can still manage the rules associated with that term.
Reactivate a term
To reactivate a retired term, click the down arrow next to the term and select Reactivate term.
Delete a term
To delete a term group, term set, or term:
- Click the down arrow next to the item.
- Select Delete term group, Delete term set, or Delete term.
- Click OK in the confirmation window.
The built-in term group cannot be deleted.
Configure Term Settings
Use the sections below to configure settings for term groups, term sets, and terms. After updating settings, click Synchronize above the term tree to synchronize changes to the destination.
Settings for term groups
Select a term group in the Term groups panel. Configurable options appear in the Settings panel.
Description: The description of the term group.
Synchronization destination: Destination options depend on content source:
-
For SharePoint On-Premises or SharePoint Online / Teams & Groups, select the SharePoint Managed Metadata Service or term store where the term group is synchronized.
-
All term stores: Synchronize to all SharePoint Managed Metadata Services or term stores connected to all scanned site collections.
-
Specific term stores: Synchronize to specific SharePoint Managed Metadata Services or term stores associated with configured site collections.
Enter a site collection URL and click Add. The URL appears in the Site collection URL column, and the connected SharePoint Managed Metadata Service or term store appears in the Term store column.
You can click Delete in the Action column to remove a site collection from the table.
-
-
For Google Drive, select the Google tenants where terms in the term group are synchronized as labels. Google Workspace supports up to 150 labels per tenant. Before synchronizing, ensure the total number of labels does not exceed this limit.
A Google tenant can only be associated with one term group. To view tenants associated with the current term group, select Specific Google tenants; associated tenants are automatically checked. To remove an association, clear the tenant selection and click Save.
- All Google tenants: Synchronize terms to all Google tenants.
- Specific Google tenants: Synchronize terms to selected Google tenants.
- None: Do not synchronize terms to Google tenants.
Settings for term sets
Select a term set in the Term groups panel. Its description appears in the Settings panel, where you can update it.
Settings for terms
Select a term in the Term groups panel. Configurable options appear in the Settings panel.
Description: The term description.
Break inheritance: If a sub-term inherits rules and retention settings from its parent, this message appears: This term inherits rules and retention settings from its parent term. To change these settings, click Break inheritance. Click Break inheritance to stop inheriting from the parent term.
By default, newly created sub-terms inherit settings from their parent. To add rules or enable retention on a sub-term, ensure the sub-term is active and inheritance has been broken.
Inherit parent settings: If a term has unique rules and retention settings, this message appears: This term has unique rules and retention settings. To inherit these settings from its parent term, click Inherit parent settings. Click Inherit parent settings to restore inheritance.
Rules: Associate the term with rules.
-
Add rule: Click Add rule, then select an object level. A new row is added to the Rules table. Select the rule to associate from the drop-down list. All rules created on the Rules page are available. After selecting a rule, you can click View to review details or Remove to remove the association. You can also click Create in the same row to create a new rule. For details, see Manage Rules.
-
Change rule order: When more than one rule of the same object level is added, you can change execution order. Click the down arrow in the order column and select the new order.
Retention setting: For Teams & Groups, SharePoint Online, OneDrive, and Exchange Online, you can apply a Microsoft 365 retention label to documents and emails classified with this term. This enforces retention so users cannot manually delete those items; items are destroyed only when they meet criteria of a running destruction rule.
Select a content source to enable retention, then enter a Microsoft 365 retention label that is already published to that source. An Enforce retention job can start any time from 10:00 p.m. to 4:00 a.m. each day to apply labels to classified documents and emails. For more information, see Microsoft documentation: Learn about retention policies and retention labels.
Microsoft has changed behavior for user deletion of retention-labeled objects. Users can delete retention-labeled items; for Teams & Groups, SharePoint Online, and OneDrive, deleted documents are retained in the Preservation Hold library. For Exchange Online, deleted emails are retained in the Recoverable Items folder.
To prevent users from manually deleting retention-labeled documents, manually disable related settings in Microsoft 365 Compliance center (Microsoft Purview) > Records management > Records management settings > Retention labels.
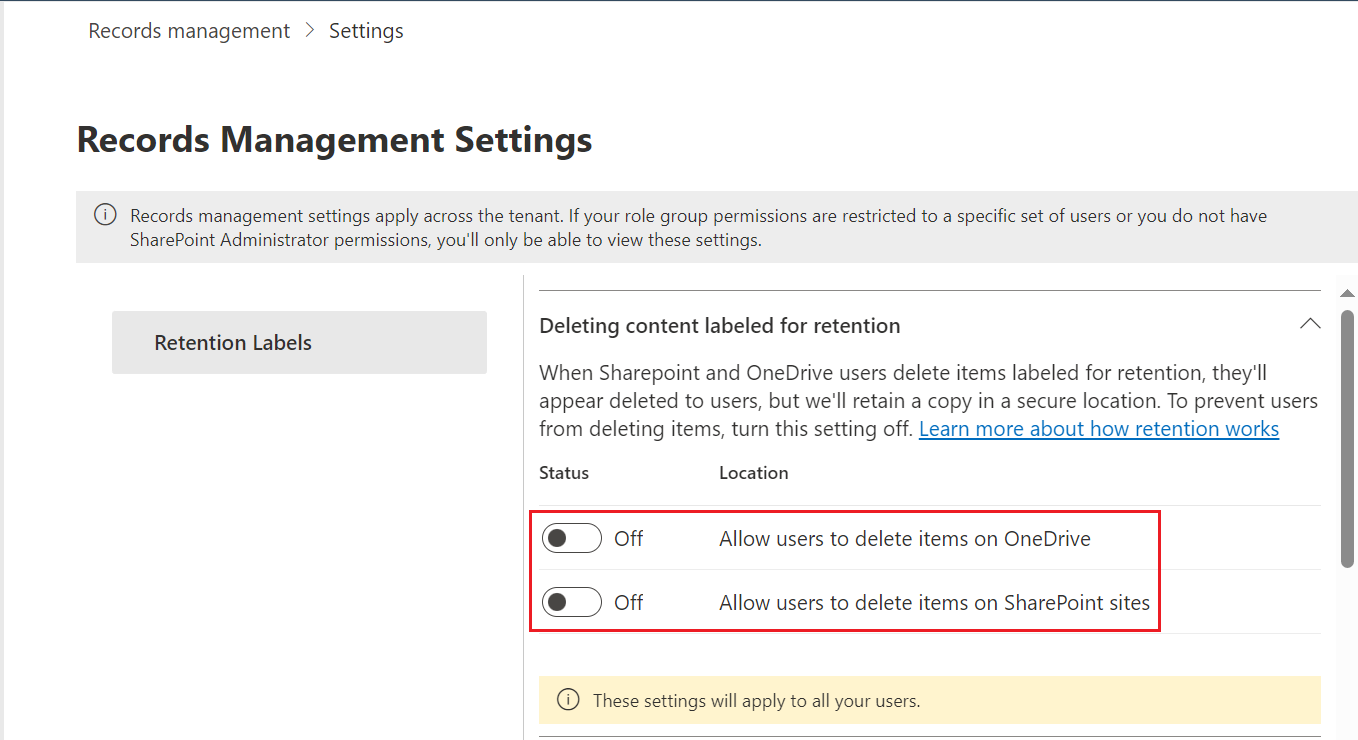
Microsoft 365 retention labels are global settings. After you define a label, all terms with retention enabled use that same label. After the Enforce retention job finishes, the label is automatically added or updated on Microsoft 365 objects classified by terms where retention is enabled.
If a conflict occurs, Microsoft 365 retention labels applied by rules take precedence over labels applied by terms.
Term activation settings: Configure when a term is available for use. For new terms, Always active is selected by default, meaning the term never retires.
- Take effect from: Select the date when the term becomes active.
- Retire after: Select the date when the term retires.
- Time range: Select both start and end dates for the active period.
Synchronize Terms
After creating or importing terms, synchronize them to their destinations so they are available for content classification. Destination depends on content source:
- For SharePoint Online and Teams & Groups, terms are synchronized to the term store.
- For SharePoint On-Premises, terms are synchronized to SharePoint Managed Metadata Services.
- For Google Drive, terms are synchronized to Google tenants as labels.
Synchronization destination for each content source is determined by the term group settings. For details, see Configure Term Settings.
To synchronize, select a term group and click Synchronize above the term tree. A Term synchronization job starts. Go to Job monitor to view job details.
Synchronization behavior:
-
If no destination term group, term set, or term has the same name as in AvePoint Opus, a new term group, term set, or term is created in the destination with corresponding settings and status.
-
If a destination term group, term set, or term already has the same name as in AvePoint Opus:
-
If the destination object was created by AvePoint Opus, the name and description settings are synchronized, and status is synchronized for term sets and terms.
-
If the destination object was not created by AvePoint Opus:
- If a term group or term set with the same name exists, the Term synchronization job fails.
- If a term with the same name exists, only that term is skipped during synchronization.
-
Export Terms and Rules
To export all terms and rules in AvePoint Opus to a ZIP file:
- Click Export terms with rules.
- An Export terms with rules job starts. Go to Job monitor to track details.
- A download process starts in Download center.
- When the download process completes, click Download.
A ZIP file is downloaded to your browser's default download location. Extract the ZIP file to get the XLSX file named in this format: Export Terms with Rules_YYYYMMDDHHMMSS.
Import Terms and Rules
Prepare the import source using one of the following methods:
- Click Import > Download template to download a template, add terms and rules, and import the completed file.
- Click Export terms with rules to download existing terms and rules as a template, update the file, then import it.
- Export terms from SharePoint Online or SharePoint On-Premises to a CSV file, update it if needed, and import it. For details, see Export Terms from SharePoint.
To import terms and rules into AvePoint Opus from a CSV or XLSX file:
-
On the Terms page ribbon, click Import. The Import panel appears.
-
Select an import method:
-
Import from a template: Click Browse, select the CSV or XLSX file, then click Open.
-
Import from Google tenants (Google Drive only): Labels in the selected tenants are imported to the selected term group as terms.
Select a term group to store imported terms, select the Google tenants, and click OK.
A Google tenant appears grayed out if it is already associated with another term group, because each Google tenant can only be associated with one term group.
If no term set named Term set exists during the first synchronization, a new term set with that name is automatically created under the selected term group to store imported terms.
-
-
Click Save. A Term import job starts. Go to Job monitor to view job details.
Imported terms appear on the Terms page. Imported rules appear on the Rules page.
Template
In the Import panel, click Download template to download the template used to prepare terms and rules.
If the template is updated in a new release, do not use a template from an earlier release to import data into Opus, because this may cause data mismatches. To ensure a successful import, always download the latest template.
Terms sheet
The following table describes columns in the Terms sheet.
| Column Name | Column Value |
|---|---|
| Term group name | Enter the term group name (less than 255 characters). |
| Term set name | Enter the term set name (less than 255 characters). |
| Level 1 term name | Enter the term name (less than 255 characters). |
| Level 2 term name | Enter the term name (less than 255 characters). |
| Level 3 term name | Enter the term name (less than 255 characters). |
| Level 4 term name | Enter the term name (less than 255 characters). |
| Level 5 term name | Enter the term name (less than 255 characters). |
| Description | Enter the description of the term group, term set, or term (less than 5000 characters).If you want to synchronize the term group, term set, or term to the term store, the description must be less than 1000 characters. |
| Inherit parent settings | When rules are applied to a term or retention is enabled, enter TRUE (inherit) or FALSE (do not inherit) to indicate whether the nested term inherits these settings from its parent term. |
| Rule name | Enter the rule name to add to the term. Separate multiple rule names with semicolons. Rules are applied in the order listed. |
| Enforce retention | Enter TRUE (enforce retention) or FALSE (do not enforce retention) to indicate whether retention is enabled so users cannot manually delete objects classified with this term. |
| Content source | Select the content source where you want to apply enforce retention: Any; SharePoint Online; Exchange Online; OneDrive. |
| Retention label for SharePoint Online | If you enforce retention for SharePoint Online documents, enter the name of an existing Microsoft 365 retention label. |
| Retention label for Exchange Online | If you enforce retention for Exchange emails, enter the name of an existing Microsoft 365 retention label. |
| Retention label for OneDrive | If you enforce retention for OneDrive documents, enter the name of an existing Microsoft 365 retention label. |
| Term activation setting | Select when the term is available: Always active; Take effect from; Retire after; Active from...to... |
| Start time | Select the start time when the term becomes active. |
| End time | Select the end time when the term becomes inactive. |
| Time zone | Select the time zone for the start and end times. |
Rules sheet
The following table describes columns in the Rules sheet.
| Column Name | Column Value | Supported Content Source | Related Rule Action |
|---|---|---|---|
| Rule name | Enter the rule name (less than 255 characters). | - | - |
| Description | Enter the rule description (less than 5000 characters). | - | - |
| Rule container | Enter the name of the rule container where this rule resides. | - | - |
| Object level | The object level is the artifact you are managing. Select an object level. | - | - |
| Disposal class | Enter the disposal class (less than 5000 characters). | - | - |
| Content source | The content source is the location or system that contains the content to be managed. Select a content source. | - | - |
| Rule criteria combination | If you add multiple rule criteria, select a criteria combination (And/Or) to define the logical relationship. If you add only one rule criterion at an object level, leave this blank. | - | - |
| Criteria type | Select a rule criterion type. | - | - |
| Criteria name | Enter a rule criterion name. | - | - |
| Criteria condition | Select a rule criterion condition. | - | - |
| Condition value | Enter a rule condition value. | - | - |
| Condition value unit | When setting a rule by time or size, select the unit for the value entered. | - | - |
| Condition start time | When setting a time-based rule, enter the condition start time. | - | - |
| Condition end time | When setting a time-based rule, enter the condition end time. | - | - |
| Rule action | Select a rule action to define how content is managed. | - | - |
| Export content format | Select an export format. | SharePoint Online; OneDrive; Exchange Online | Export content |
| Include related records | Enter TRUE (remove related records) or FALSE (do not remove related records) to indicate whether content is removed together with related records. | SharePoint Online; Physical Records | Destroy content |
| Include declared records | Enter TRUE (remove documents/items declared as records) or FALSE (do not remove them). | SharePoint Online; OneDrive; SharePoint On-Premises | Destroy content |
| Include documents/items locked by records label | Enter TRUE (remove documents/items locked by a records label) or FALSE (do not remove them). | SharePoint Online; OneDrive | Destroy content |
| Leave stub | Enter TRUE (leave a stub) or FALSE (do not leave a stub) to indicate whether a stub remains in the content source for each removed document. | SharePoint Online; OneDrive; File System; SharePoint On-Premises; Azure File Share | Destroy content |
| Stub template | If you choose to leave a stub, enter the stub template name. | SharePoint Online; OneDrive; File System; SharePoint On-Premises; Azure File Share | Destroy content |
| Store before disposal | Enter TRUE (store content before disposal) or FALSE (do not store content before disposal). | SharePoint Online; OneDrive | Destroy content |
| Remove box when empty | Enter TRUE (mark boxes as Destroyed) or FALSE (boxes are not destroyed) to indicate whether the box is marked as Destroyed when all contained folders are destroyed. | Physical Records | Destroy content |
| Remove retention label before a document/item is destroyed | Enter TRUE or FALSE to indicate whether a retention label is removed before a document/item is destroyed. | SharePoint Online; OneDrive | Destroy content |
| Declare as record | Enter TRUE (declare the item/document as a record) or FALSE (do not declare it as a record). | SharePoint Online; OneDrive; SharePoint On-Premises | Declare or tag content |
| Tag document/item | Enter TRUE (tag documents/items) or FALSE (do not tag documents/items) to indicate whether additional metadata is applied. | SharePoint Online; OneDrive; Exchange Online; SharePoint On-Premises. Exceptions: tagging columns and custom columns is unsupported for Exchange Online; tagging Microsoft 365 retention labels is unsupported for SharePoint On-Premises. | Declare or tag content |
| Tag Archived (Yes/No) column | If you choose to tag documents/items, enter TRUE (yes) or FALSE (no) to indicate whether the Archived column is added. | SharePoint Online; OneDrive; Exchange Online; SharePoint On-Premises. Exceptions: tagging columns and custom columns is unsupported for Exchange Online; tagging Microsoft 365 retention labels is unsupported for SharePoint On-Premises. | Declare or tag content |
| Tag Archived By column | If you choose to tag documents/items, enter TRUE (yes) or FALSE (no) to indicate whether the Archived By column is added. | SharePoint Online; OneDrive; Exchange Online; SharePoint On-Premises. Exceptions: tagging columns and custom columns is unsupported for Exchange Online; tagging Microsoft 365 retention labels is unsupported for SharePoint On-Premises. | Declare or tag content |
| Tag Archived Time column | If you choose to tag documents/items, enter TRUE or FALSE to indicate whether the Archived Time column is added. | SharePoint Online; OneDrive; Exchange Online; SharePoint On-Premises. Exceptions: tagging columns and custom columns is unsupported for Exchange Online; tagging Microsoft 365 retention labels is unsupported for SharePoint On-Premises. | Declare or tag content |
| Tag custom column | If you choose to tag documents/items, enter TRUE (yes) or FALSE (no) to indicate whether a custom column is added. | SharePoint Online; OneDrive; Exchange Online; SharePoint On-Premises. Exceptions: tagging columns and custom columns is unsupported for Exchange Online; tagging Microsoft 365 retention labels is unsupported for SharePoint On-Premises. | Declare or tag content |
| Custom column type | If you choose to add a custom column, select its type: Text; Number; Date and Time; Yes/No. | SharePoint Online; OneDrive; Exchange Online; SharePoint On-Premises. Exceptions: tagging columns and custom columns is unsupported for Exchange Online; tagging Microsoft 365 retention labels is unsupported for SharePoint On-Premises. | Declare or tag content |
| Custom column name | Enter the custom column name. | SharePoint Online; OneDrive; Exchange Online; SharePoint On-Premises. Exceptions: tagging columns and custom columns is unsupported for Exchange Online; tagging Microsoft 365 retention labels is unsupported for SharePoint On-Premises. | Declare or tag content |
| Custom column value | Enter the custom column value.This is the value displayed in the configured column. | SharePoint Online; OneDrive; Exchange Online; SharePoint On-Premises. Exceptions: tagging columns and custom columns is unsupported for Exchange Online; tagging Microsoft 365 retention labels is unsupported for SharePoint On-Premises. | Declare or tag content |
| Custom column time zone | If the custom column is of type Date and Time, select the time zone. | SharePoint Online; OneDrive; Exchange Online; SharePoint On-Premises. Exceptions: tagging columns and custom columns is unsupported for Exchange Online; tagging Microsoft 365 retention labels is unsupported for SharePoint On-Premises. | Declare or tag content |
| Retention label name | If you want to tag documents/items with a Microsoft 365 retention label, enter the retention label name. | SharePoint Online; OneDrive; Exchange Online; SharePoint On-Premises. Exceptions: tagging columns and custom columns is unsupported for Exchange Online; tagging Microsoft 365 retention labels is unsupported for SharePoint On-Premises. | Declare or tag content |
| Records label | Enter a retention label name where Mark items as a record is enabled. | SharePoint Online; OneDrive | Declare or tag content |
| Destination | If the selected content source is SharePoint Online, OneDrive, or Exchange Online, enter the destination library URL for moved content. Ensure the destination is a Document Library or Record Library. If the selected content source is File System, enter the destination folder path. | SharePoint Online; OneDrive; Exchange Online; File System. Exceptions: declaring moved documents as read-only records in the destination is available only for SharePoint Online and OneDrive; keeping source classification in the destination is unsupported for File System. | Move content to new location |
| Conflict resolution | If a file with the same name already exists in the destination, select a conflict resolution option: Skip; Overwrite; Add a suffix. | SharePoint Online; OneDrive; Exchange Online; File System. Exceptions: declaring moved documents as read-only records in the destination is available only for SharePoint Online and OneDrive; keeping source classification in the destination is unsupported for File System. | Move content to new location |
| Declare moved document | Enter TRUE (declare the moved document as a record) or FALSE (do not declare the moved document as a record). | SharePoint Online; OneDrive; Exchange Online; File System. Exceptions: declaring moved documents as read-only records in the destination is available only for SharePoint Online and OneDrive; keeping source classification in the destination is unsupported for File System. | Move content to new location |
| Remove source content | Enter TRUE (remove source content from Exchange) or FALSE (do not remove source content). | SharePoint Online; OneDrive; Exchange Online; File System. Exceptions: declaring moved documents as read-only records in the destination is available only for SharePoint Online and OneDrive; keeping source classification in the destination is unsupported for File System. | Move content to new location |
| Keep source classification | Enter TRUE (keep source classification) or FALSE (do not keep source classification) after content is moved. | SharePoint Online; OneDrive; Exchange Online; File System. Exceptions: declaring moved documents as read-only records in the destination is available only for SharePoint Online and OneDrive; keeping source classification in the destination is unsupported for File System. | Move content to new location |
| Enable manual approval | Enter TRUE (enable manual approval) or FALSE (do not enable manual approval). | SharePoint Online; OneDrive; Exchange Online; File System; Physical Records; SharePoint On-Premises; Azure File Share; Connector; Box; Google Drive | Destroy content; Declare or tag content |
| Send Email Notification | If manual approval is enabled, enter TRUE (send email notification) or FALSE (do not send email notification) to notify record reviewers when records are waiting for approval. | SharePoint Online; OneDrive; Exchange Online; File System; Physical Records; SharePoint On-Premises; Azure File Share; Connector; Box; Google Drive | Destroy content; Declare or tag content |
| Manual approval type | If manual approval is enabled, select a manual approval type: Manual Approval Process (follows a defined process); Record Owner (sends the notification to the configured reviewer, who can assign the process). | SharePoint Online; OneDrive; Exchange Online; File System; Physical Records; SharePoint On-Premises; Azure File Share; Connector; Box; Google Drive | Destroy content; Declare or tag content |
| Manual approval process name | If Manual Approval Process is selected, enter the manual approval process name. | SharePoint Online; OneDrive; Exchange Online; File System; Physical Records; SharePoint On-Premises; Azure File Share; Connector; Box; Google Drive | Destroy content; Declare or tag content |
| Record reviewer | If Record Owner is selected, enter users or groups. Separate multiple names with semicolons. | SharePoint Online; OneDrive; Exchange Online; File System; Physical Records; SharePoint On-Premises; Azure File Share; Connector; Box; Google Drive | Destroy content; Declare or tag content |
| Export content before action | Enter TRUE (export content) or FALSE (do not export content). | SharePoint Online; OneDrive; Exchange Online; Google Drive | Destroy content; Declare or tag content; Move content to archival storage |
| Export format | If you choose to export content, select an export format: VEO; NAA; NARA. | SharePoint Online; OneDrive; Exchange Online; Google Drive | Destroy content; Declare or tag content; Move content to archival storage |
| Storage location | Enter the storage location name used to store content. | SharePoint Online; OneDrive; Physical Records | Destroy content; Move content to archival storage |
| Export to destination library | If you choose to export content, enter the full URL of a library within an Opus-managed site to store exported content. | SharePoint Online; OneDrive; Exchange Online | Export content before action; Export content |
| Export location | If you choose to export content, enter the name of an existing SFTP or Microsoft Azure Blob Storage location in Opus. Existing storage locations of type Google Cloud Storage are available for Google Drive only. Default Storage Location is not supported. | SharePoint Online; OneDrive; Exchange Online; Google Drive | Export content before action; Export content |